


Top Peak-Bagging Hikes in Yosemite
The granite domes and spires of Yosemite Valley and Tuolomne Meadows are a peakbagger’s dream. With trailheads sprinkled across the Valley and Tioga Pass, relatively short hikes take you to incredible summits. While the trails are steep, the views of the surrounding Sierra Mountains will keep you motivated with each uphill step. We’ve narrowed down our favorites, and included a little something for everyone. From the straightforward 2.5 mile hike to the top of Lembert Dome to the third-class route-finding scramble of Mount Conness, hikers of all abilities find joy in the granite wonderland of Yosemite.
Award Winning Yosemite Hiking Adventures
| Trip | Difficulty | Days | Miles |
| Lembert Dome | Easy | 1 | 2.8 |
| Mount Hoffman | Moderate | 1 | 6 |
| Mount Dana | Strenuous | 1 | 7 |
| North Dome | Strenuous | 1-2 | 8.8 |
| Mount Conness | Strenuous | 1-3 | 13.4 |
| Clouds Rest & Half Dome | Strenuous | 2-5 | 23 |
1. Lembert Dome
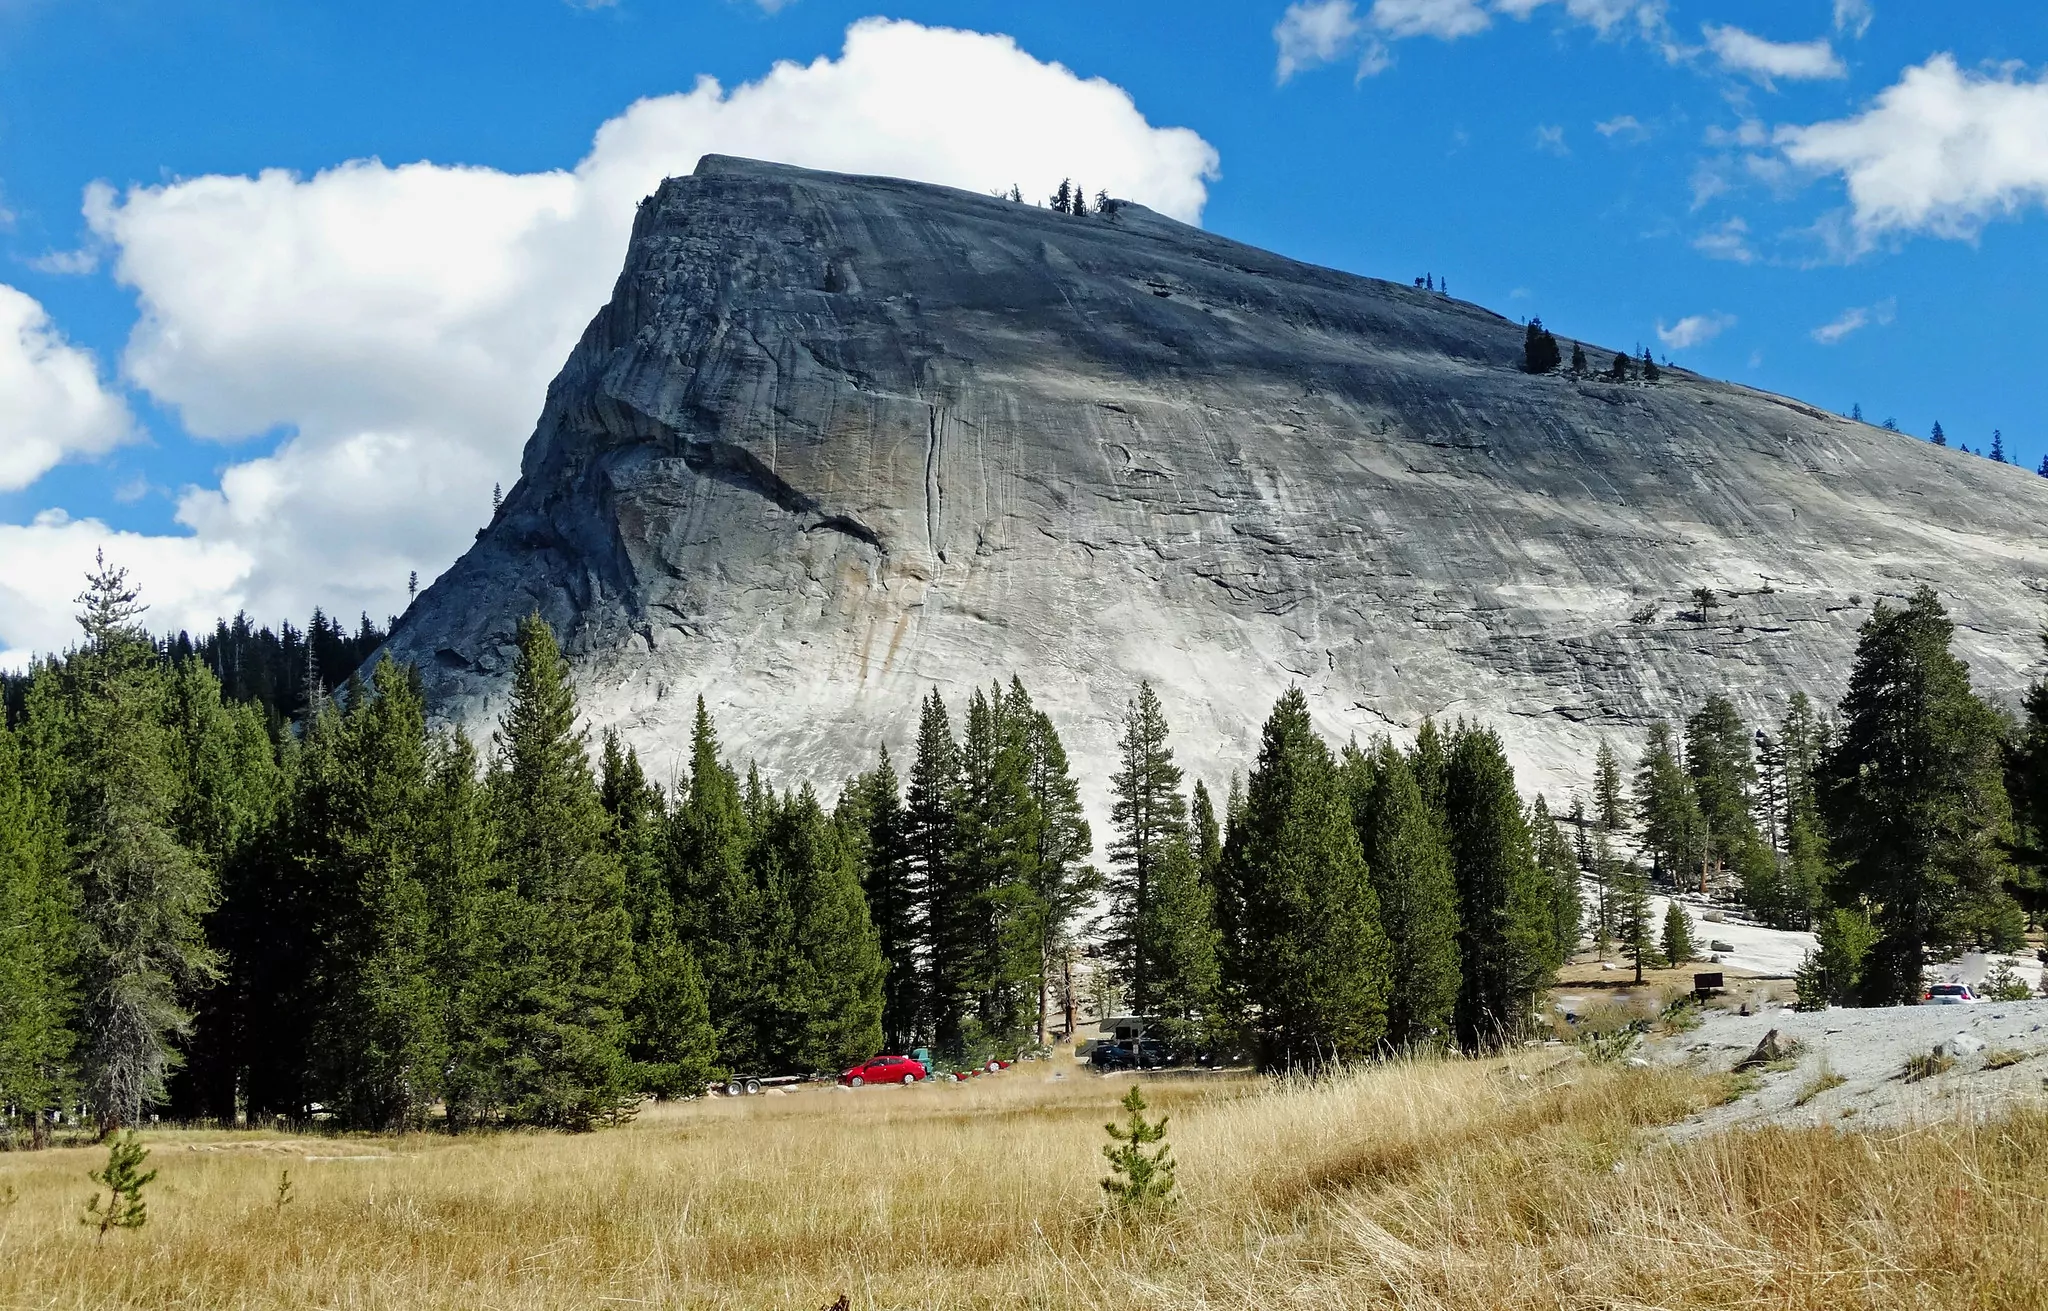
Lembert Dome by Don Graham (CC BY 2.0)
Trail Overview
This short trail leads you up one of the most impressive granite domes in Tuolumne Meadows. Start at the Dog Lake Trailhead off Tioga Pass. Hike through forest and meadows for three-quarters of a mile before turning left at the junction towards Lembert Dome. From here, hike up the sticky granite slabs as you rise high above the meadows. You’ll want to wear shoes with adequate grip to feel confident as you move on the rock. This section of trail is unmarked: simply head uphill until you reach the top.
Marvel at the stunted, wind-sculpted pines in the sea of granite. As you get to the summit, hold onto your hat. The wind at the top of Lembert Dome is notorious for sweeping caps off of unsuspecting hikers. But the panoramic views will also blow you away. You’ll be gazing out on the snaking Tuolumne River, Mount Dana, and the jagged pinnacles of the Cathedral Range. Because of the low mileage to the peak, Lembert Dome an excellent place to catch the sunset over Tuolumne Meadows.
Logistics
Seasons and Conditions
Tioga Pass is usually open from late-May through October, depending on the snow conditions each year. Additionally, do not attempt to hike Lembert Dome if there are thunderstorms in the area. Not only is the top of the dome a high-risk area for lightning, but the granite slabs are incredibly slippery during or after a rainstorm.
Permits & Fees
No permit is necessary to day-hike in Yosemite National Park. You must pay an entrance fee of $35/vehicle (valid for seven days) when you enter the park. Alternatively, an America the Beautiful Pass costs $80/year and covers entrance fees for all federally-managed fee lands, including National Parks, Monuments, and Forest Service areas.
All-inclusive Yosemite Backpacking Trips
2. Mount Hoffmann
Trail Overview
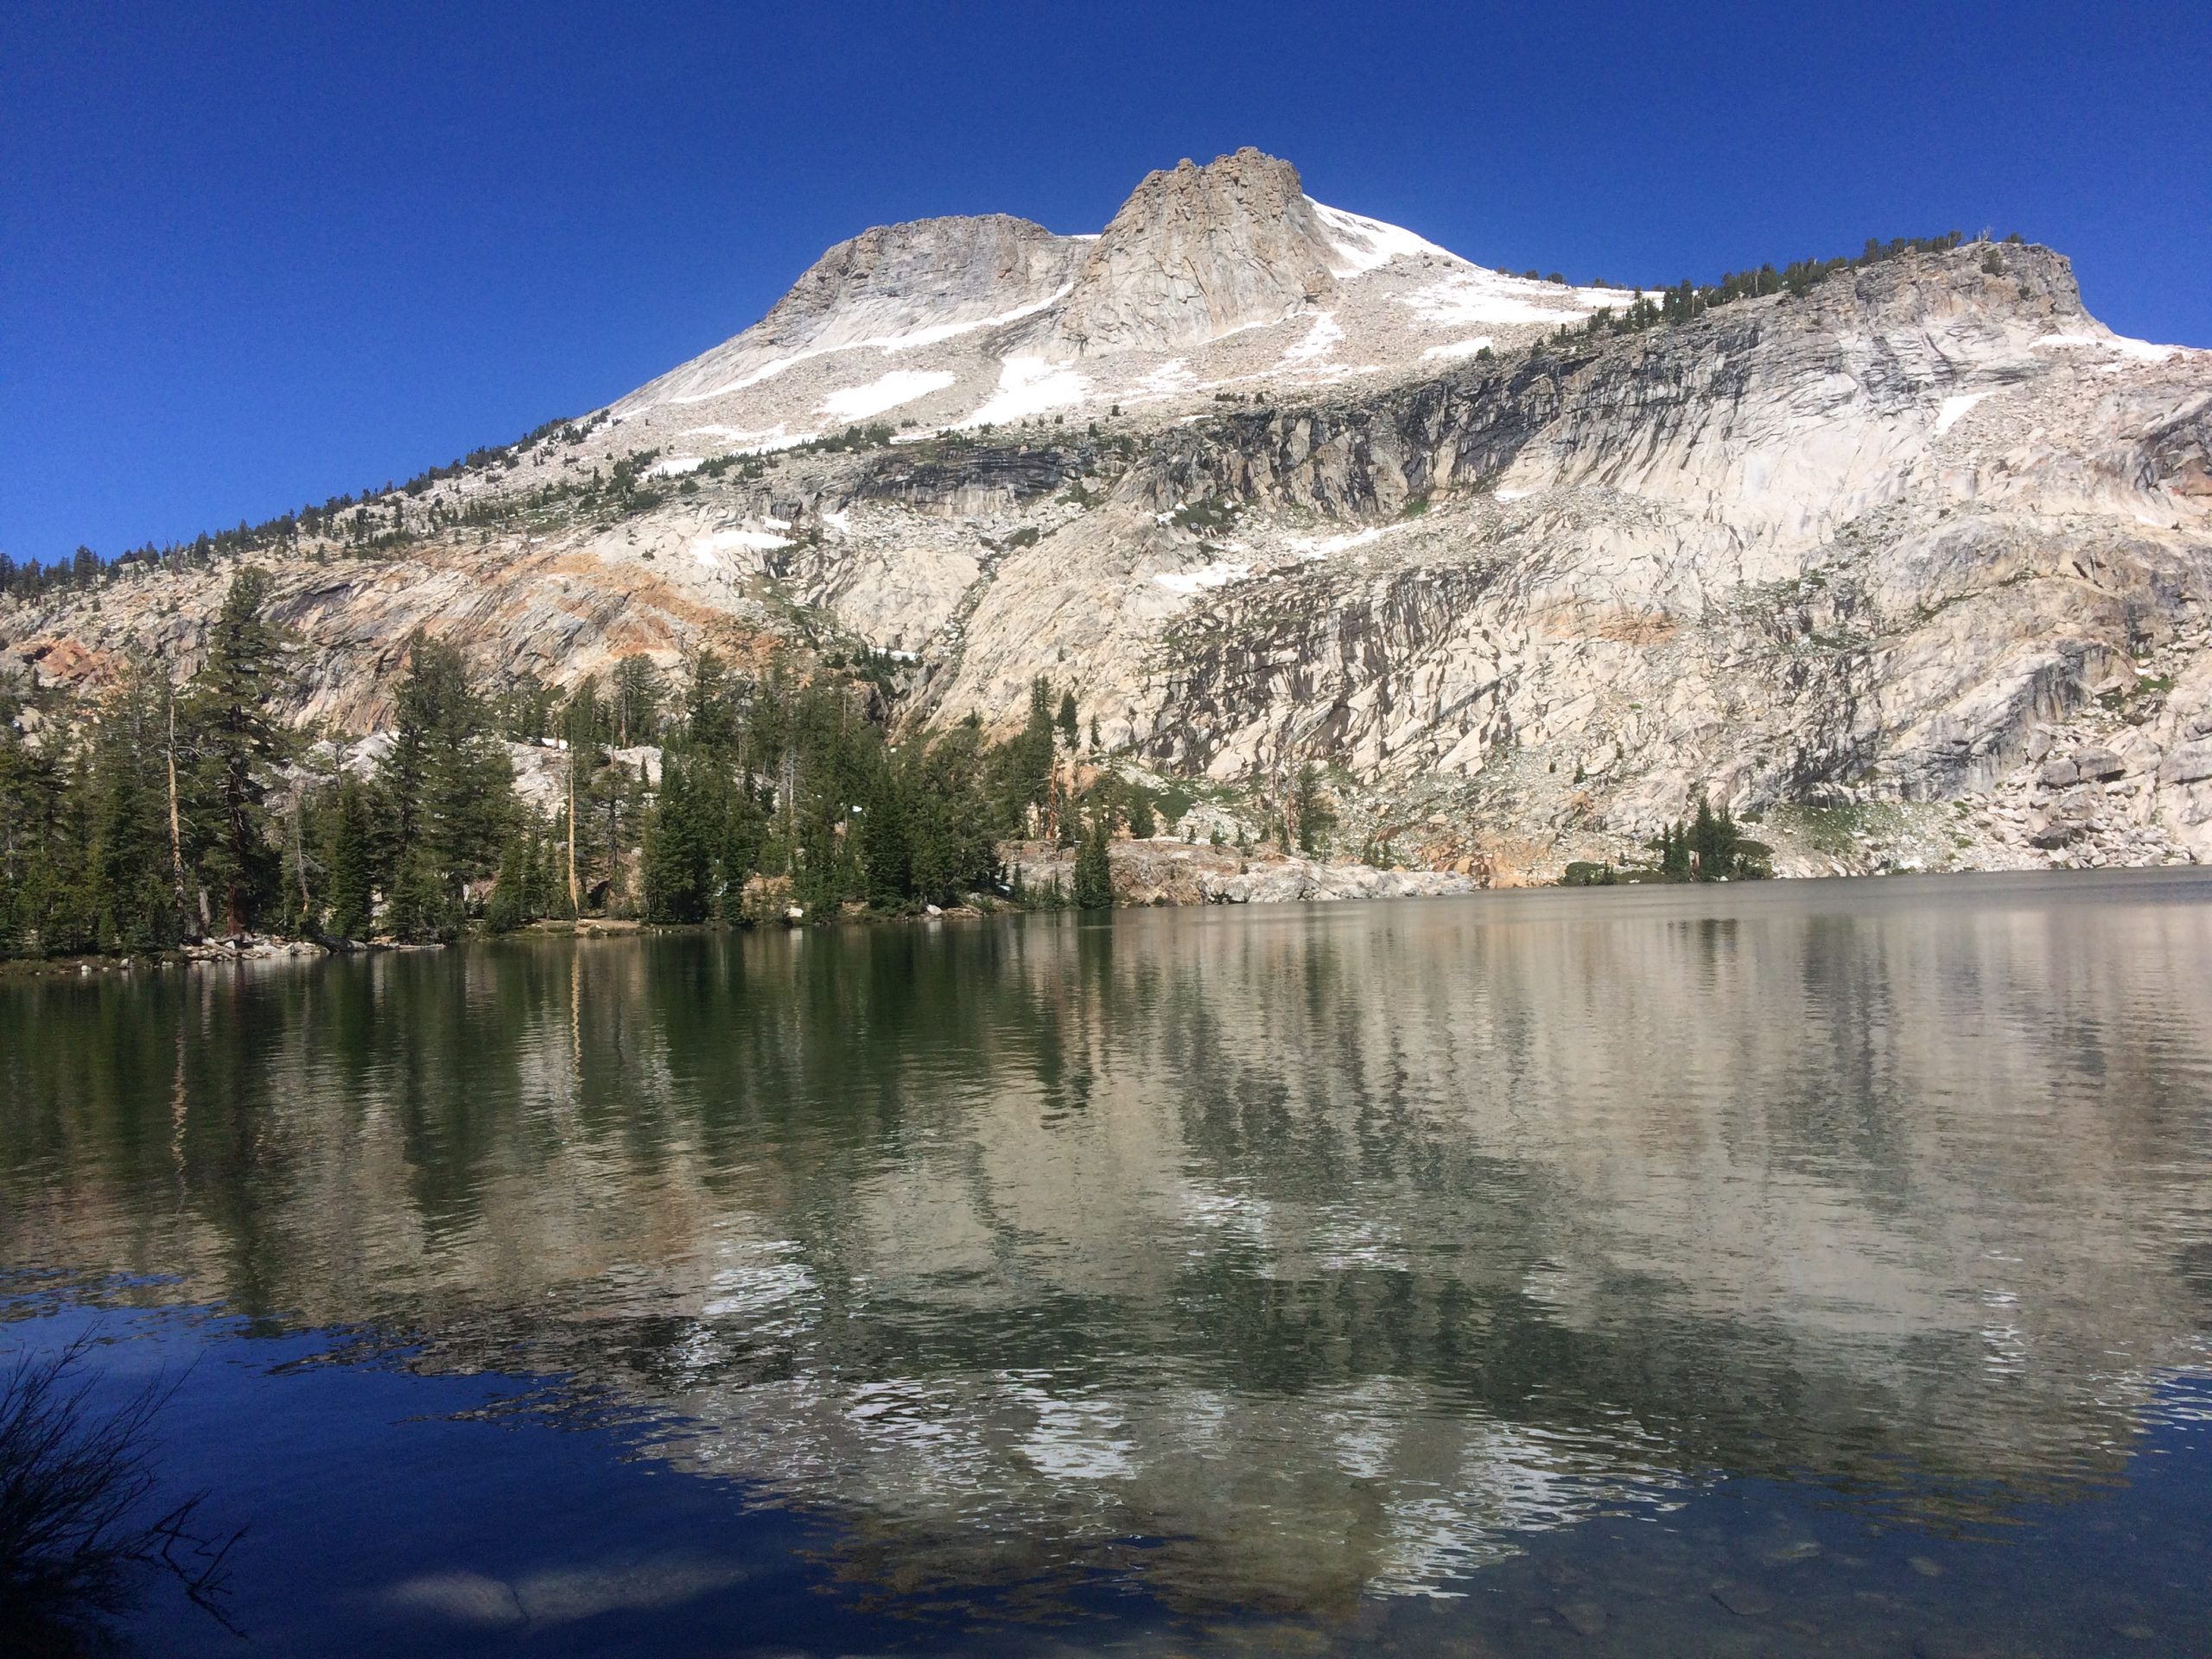
Mount Hoffmann (10,856′) is a craggy peak that looms high above May Lake at the geographic center of Yosemite National Park. The short but steady trail to May Lake offers expansive views towards Tioga Pass, Clouds Rest, and Half Dome. Soon, May Lake appears: a glimmering alpine lake seated beneath water-streaked granite cliffs. This lake, home to a High Sierra Camp, is a worthy destination on its own.
From here, a climber’s trail skirts the south end of the lake, crosses through damp meadows, and ascends slippery scree slopes. Eventually, you’ll pass through a lunar-like landscape where the rocky summit of Mount Hoffman seems to retreat with each step. After you cross that last stretch, a short section of class 2 scrambling (requiring the use of hands) adds excitement to an already-rewarding hike. Clamber up and over granite boulders, finding the path that suits your abilities, as you work your way to the summit. Listen for the whistle of yellow-bellied marmots, which often frequent the peak looking for snack handouts from humans—but resist the urge to feed these furry creatures.
As you crest the ridge, 360-degree views of the entire park spread before you. Pull out your map and try to identify as many peaks as you can: look for the rounded domes of Yosemite Valley to the south, the spires of the Cathedral Range in the west, and the blocky massif of Mount Conness to the northwest.
Trail Details
May Lake
Begin at the May Lake Trailhead off of Tioga Pass. Hit the trail and head steadily uphill for 1.3 miles through a forest of lodgepole pine and red fir. As the trail gets rockier, pause to take in the peek-a-boo views of the surrounding peaks. The views from this portion of the trail are unique: Clouds Rest’s rolling slabs and Half Dome’s vertical face dominate the ridgeline. Soon, you’ll approach May Lake and the High Sierra Camp. The crystal clear waters of May Lake dance with a mesmerizing reflection of Mount Hoffman. Spend some time at the lake, basking in the sun on the lakeside boulders, or resting your feet as you prepare for your big climb.
Mount Hoffmann
The trail from May Lake to Mount Hoffmann is a bit harder to follow. Bear left to stay along the south shore of the lake. The trail continues to head south, away from the lake, as you traverse through alpine meadows. As you climb, you gain astonishing views of the lake and the gray and orange flanks of Mount Hoffmann.
Half a mile from May Lake, the trail to the summit steepens significantly. Head straight uphill as you follow cairns and watch your step on the loose hillside. This stretch isn’t for the faint of heart—you’ll gain over 1000 feet of elevation in less than a mile. Take your time as the air becomes thinner at this high elevation. Eventually, the climb levels out below a false summit, and you stand before a vast, rocky moonscape that leads to the blocky peak of Mount Hoffmann. As you cross this long rock field, keep your eyes on the incredible views across Tenaya Canyon and into Yosemite Valley.
The last few hundred feet to the summit are a class two scramble, meaning you may need to use your hands. If you stay left, there is minimal risk. However, the closer you get to the right of the summit block, the more dramatic the exposure. A faint path leads through the boulder slabs, so follow cairns for the easiest route to the top.
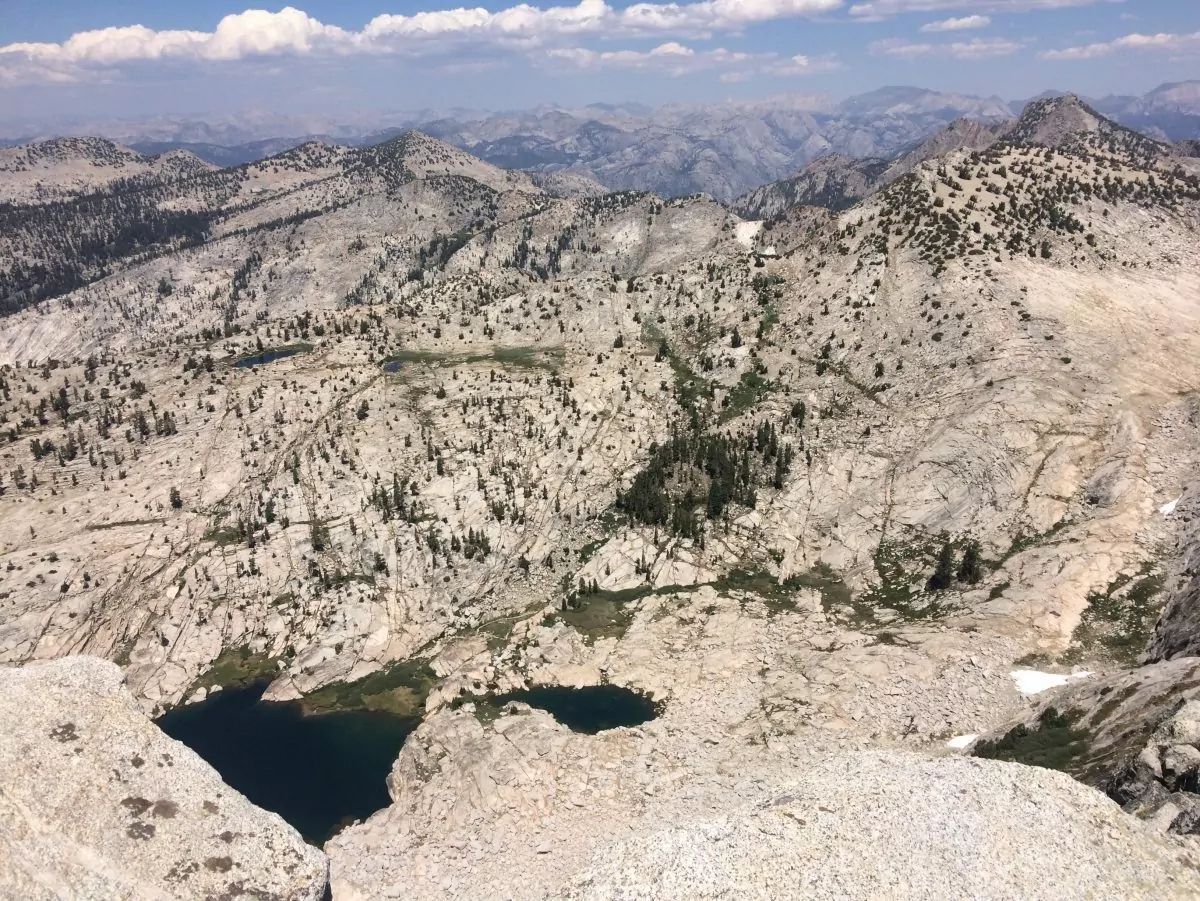
The views from the summit are some of the most impressive in the park. The north edge of Mount Hoffman drops off to a glassy alpine lake thousands of feet below. Tree-studded expanses of granite sweep in nearly every direction, as the jagged peaks of the Sierra Nevada layer on the horizon. And here you are, in the middle of it all.
Hiking Logistics
Season
Tioga Pass is usually open from late-May through October, depending on the snow conditions each year.
In the late spring and early summer, you might encounter snow, especially on the route from May Lake to the summit of Mount Hoffman. From May through June, bring microspikes and trekking poles for sections of snow travel.
Permits & Fees
No permit is necessary to day-hike in Yosemite National Park. An entrance fee of $35/vehicle (valid for seven days) must be paid when you enter the park. Alternatively, an America the Beautiful Pass costs $80/year and covers entrance fees for all federally-managed fee lands, including National Parks, Monuments, and Forest Service areas.
Hike to Mount Hoffmann on a Guided Trip!
Guided Yosemite camping tours and Yosemite Inn-based Tours are available and are a stress-free, exciting way to get into the wilderness. Both of these multi-day adventures culminate with a hike to May Lake, and a summit attempt of Mount Hoffman. The tour company handles accommodations, gear, transportation, meals, and provides a professional guide so you can focus 100% on enjoying your adventure.
3. Mount Dana
Trail Overview
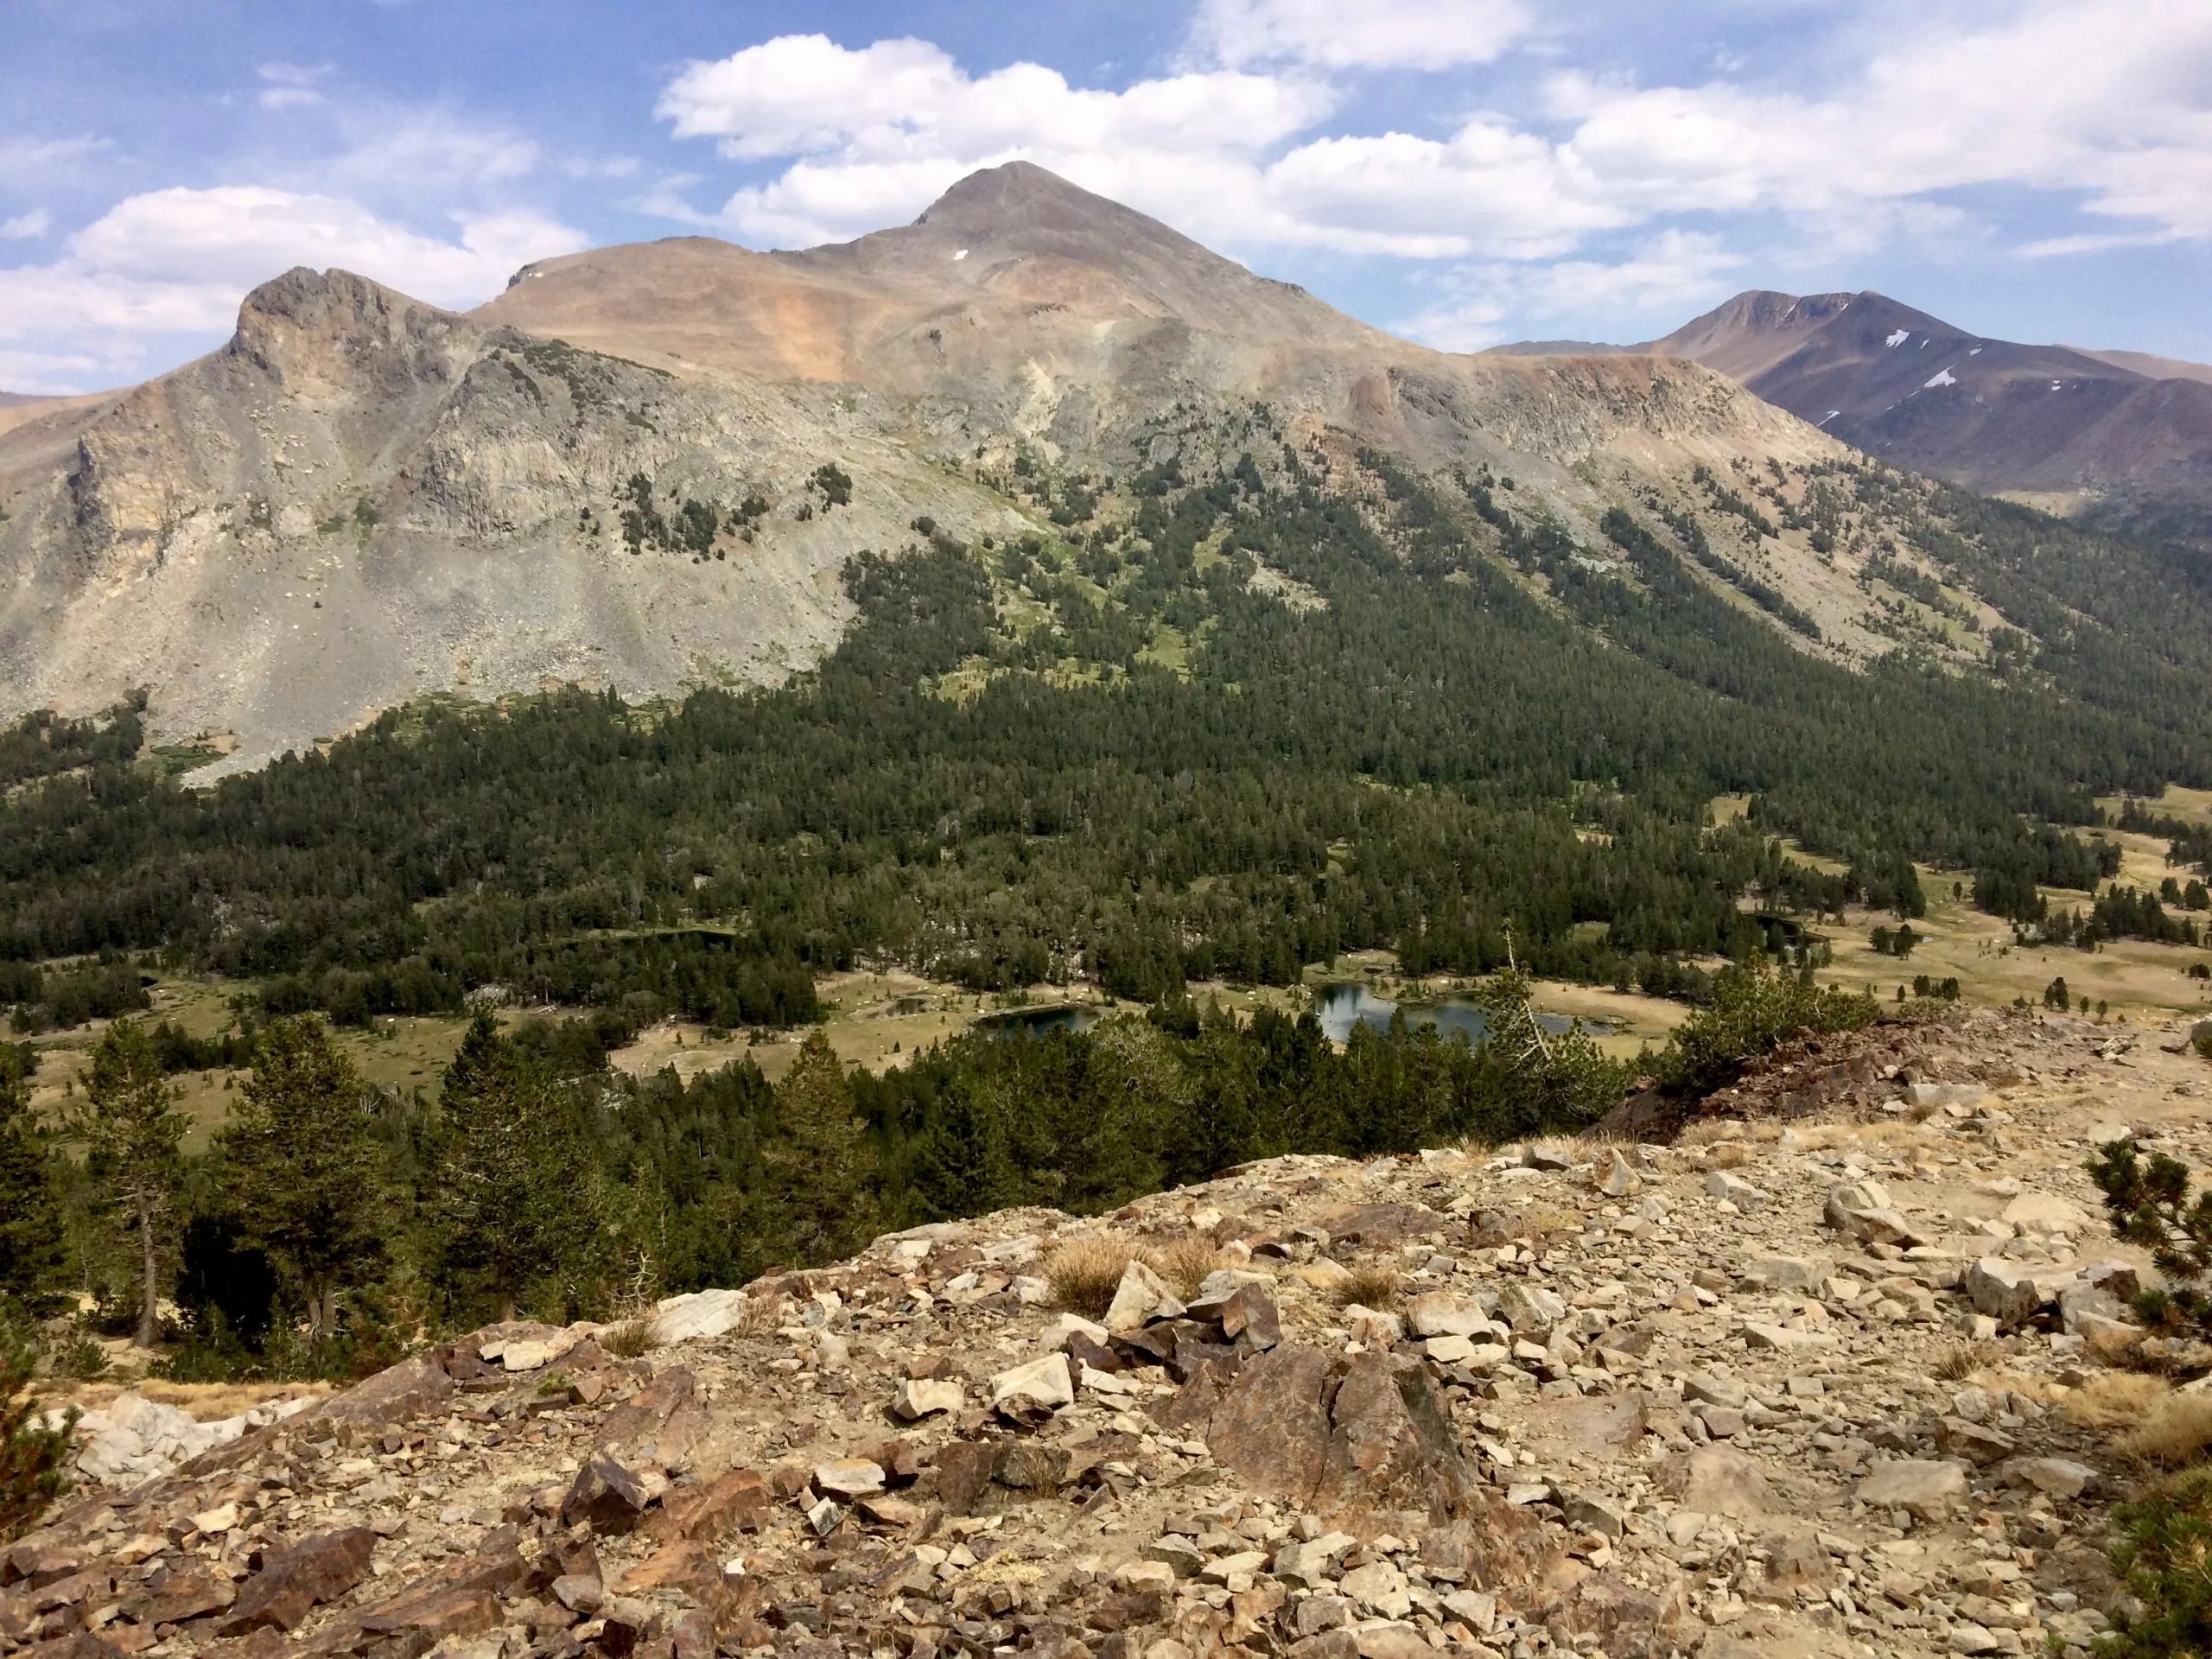
Mount Dana (13,061’) is the second-highest peak in Yosemite National Park—topped only by Mount Lyell—and it is a spectacular summit hike because of its accessibility from the road. Meander through meadows before climbing to the Dana Plateau. The views begin to open up, and the rolling, barren scree fields almost appear velvety from a distance. Talus-hop along the red and purple metamorphic flanks to the summit. Once you approach the top of Mount Dana, the dramatic eastern edge drops off into a vertigo-inducing abyss. Spin around and embrace the sights as you stand amidst a panorama of snow-capped peaks. You’ll feel as if the whole Sierra Range is encircling you. In addition, since Mount Dana sits on the eastern edge of the park, this view is unique because Mono Lake dominates the frame to the northeast.
Trail Details
Start this trail at a small parking area right near the Tioga Pass Entrance Station. Head south through wildflower-filled meadows, passing numerous small lakes. The trail is gentle for the first three-quarters of a mile before it heads steeply uphill. The rest of the hike is sustained: you’ll be gaining over 3000′ in less than three miles. Continue trekking as the trees become shorter, and vegetation becomes sparser. Eventually, the trail is entirely above the treeline and flattens out for a brief respite at the plateau.
Once you reach the Dana Plateau, at around 11,500′, the summit still towers 1600′ above you. Cairns mark the path to the top, but faint trails spread in many directions. Take your time, as the trail becomes one giant boulder field. Once you reach the summit, bask in the grandeur, or hunker down behind the wind barriers for lunch before heading back the direction you came.
Logistics
Trail Difficulties
Carry enough water for your entire hike. The trail is exposed, steep, and at high elevation. There will be no opportunity to fill water above the meadows for most of the hiking season.
Hikers should feel competent in navigation and route-finding: the trail is unmaintained and fades in and out on your way to the summit. In addition, hikers need to be aware of altitude sickness symptoms due to the high elevation of Mount Dana’s summit.
As with any peakbagging adventure, much of this hike takes place above treeline. Hikers should consult weather reports before attempting to summit Mount Dana. Start early in the day to lessen your chance of encountering afternoon thunderstorms.
Hiking Season
The best time to hike is July through September for minimal snow encounters. However, you can encounter snowfields at any time of year due to the high elevation of this trail.
Additionally, Tioga Pass is usually open from late-May through October, depending on the snow conditions each year.
Permits & Fees
No permit is necessary to day-hike in Yosemite National Park. An entrance fee of $35/vehicle (valid for seven days) must be paid when you enter the park. Alternatively, an America the Beautiful Pass costs $80/year and covers entrance fees for all federally-managed fee lands, including National Parks, Monuments, and Forest Service areas.
Inspired Exploration with Wildland Trekking
4. North Dome
Trail Overview
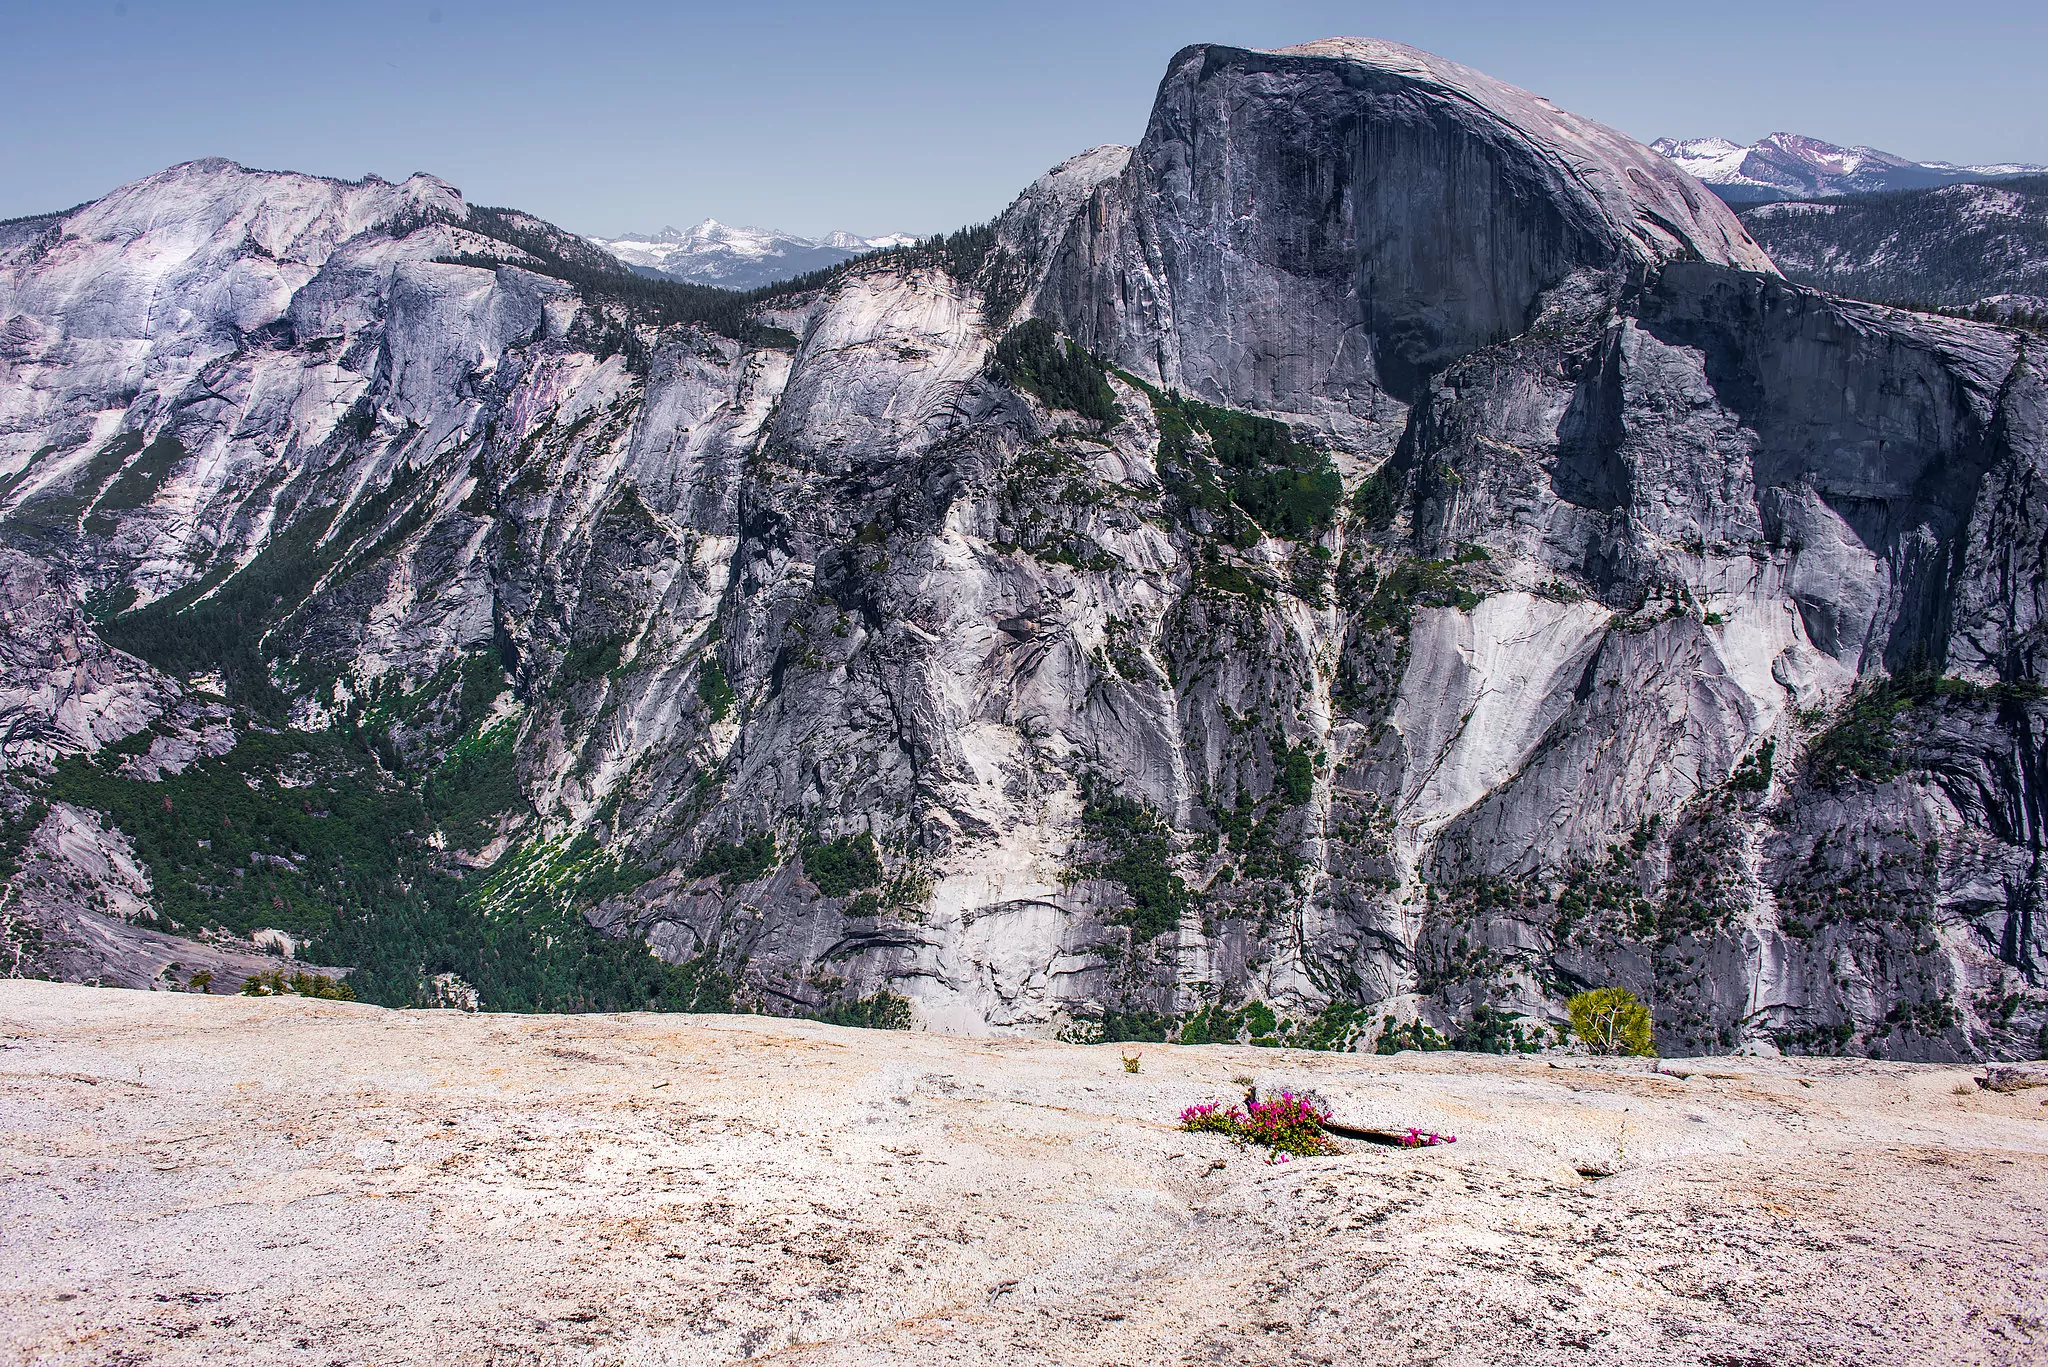
North Dome, the little sister of the famous Half Dome, provides an exceptional summit experience as you gaze head-on at the vertical face of Half Dome. North Dome is achievable as a day hike, but it’s worthwhile to hike along the North Rim and spend three or four days soaking in the majesty of the Yosemite Valley from high above. This hike packs a punch—you’ll be gaining and losing over 4000 feet of elevation—but the seclusion and non-stop views are more than worth your hard work.
Trail Details
Start at the Mirror Lake Trailhead and meander along a flat trail until you reach the popular Mirror Lake. In summer, this is a great place to stop for a dunk in the cool waters before you begin your hike.
Continue along Tenaya Creek for a mile until you reach the junction with the Snow Creek Trail. Bear left, and prepare for an uphill slog. Seemingly unending switchbacks take you higher and higher above the valley. However, after about a dozen switchbacks views of Yosemite Valley begin. Take it slow and steady, and enjoy the scenery.
After another 2.5 miles, you’ll reach a junction at Snow Creek. Head left towards North Dome and Indian Rock. Campsites along this trail make an excellent option for a first night camp.
Continuing on, you’ll still be climbing— through black oak and then lodgepole pine forest—to reach the North Rim. (Just not quite so steeply!) Two more miles of hiking brings you to another junction. Take another left onto the North Dome Trail. You’ll soon reach Indian Rock, a prominent natural arch and the highest point of elevation along your hike. This natural arch perfectly frames Half Dome, two and a half miles across the valley.
After Indian Rock, continue along Indian Ridge downhill to North Dome. Watch your step on the granite slabs as you descend towards the summit. Once you’ve had your fill, set up camp nearby and enjoy unobstructed views of the night sky.
The last stretch of trail joins with a Yosemite favorite: the Upper Yosemite Falls Trail. At the top of the falls, you’ll meet back up with the crowds. Feel the power of the waterfall as it dives off a thousand-foot precipice. Once you’ve spent enough time at the top, continue your descent down to the valley.
Hiking Logistics
Alternative Trail
If North Dome intrigues you, but you’re not up for a 4000′ uphill trek on the Snow Creek Trail, you can access North Dome from the Porcupine Creek Trail off of Tioga Pass. This day hike is a more moderate option to gain the same north rim views from the summit and from Indian Rock. This trail opens later in the season, as Tioga Pass doesn’t stay clear of snow year-round.
Hiking Season
This hike is an excellent early season summit, accessible months before Tioga Pass opens. North Dome is accessed from the Yosemite Valley and can be clear of snow as early as May.
May through June is ideal for spring conditions, including high water levels and blooming wildflowers. September through October offers fantastic autumnal views. This hike gets hot and more crowded in July and August.
If you want to hit North Dome in the height of the summer, plan to access it as a day hike from Porcupine Creek off of Tioga Pass.
Permits
All backpackers need to get a free wilderness permit before camping in the backcountry of Yosemite National Park.
Yosemite National Park is one of the most popular backpacking destinations in the country. Reservations are not required but are recommended for popular trailheads during peak season. Reservations cost $5 per confirmed reservation, and an additional $5/hiker. If you plan to hike during this time, enter the lottery 24 weeks before you anticipate backpacking.
However, 40% of backcountry permits are first-come, first-served. So, if you don’t secure a permit in advance, head to the nearest Wilderness Center at 11 AM on the day of your intended hike.
Hike North Dome on a Guided Trip!
Guided North Rim backpacking trips are available and are a stress-free, exciting way to get into the wilderness. The tour company handles permits, gear, transportation, meals, and provides a professional guide so you can focus 100% on enjoying your adventure.
5. Mount Conness
Trail Overview
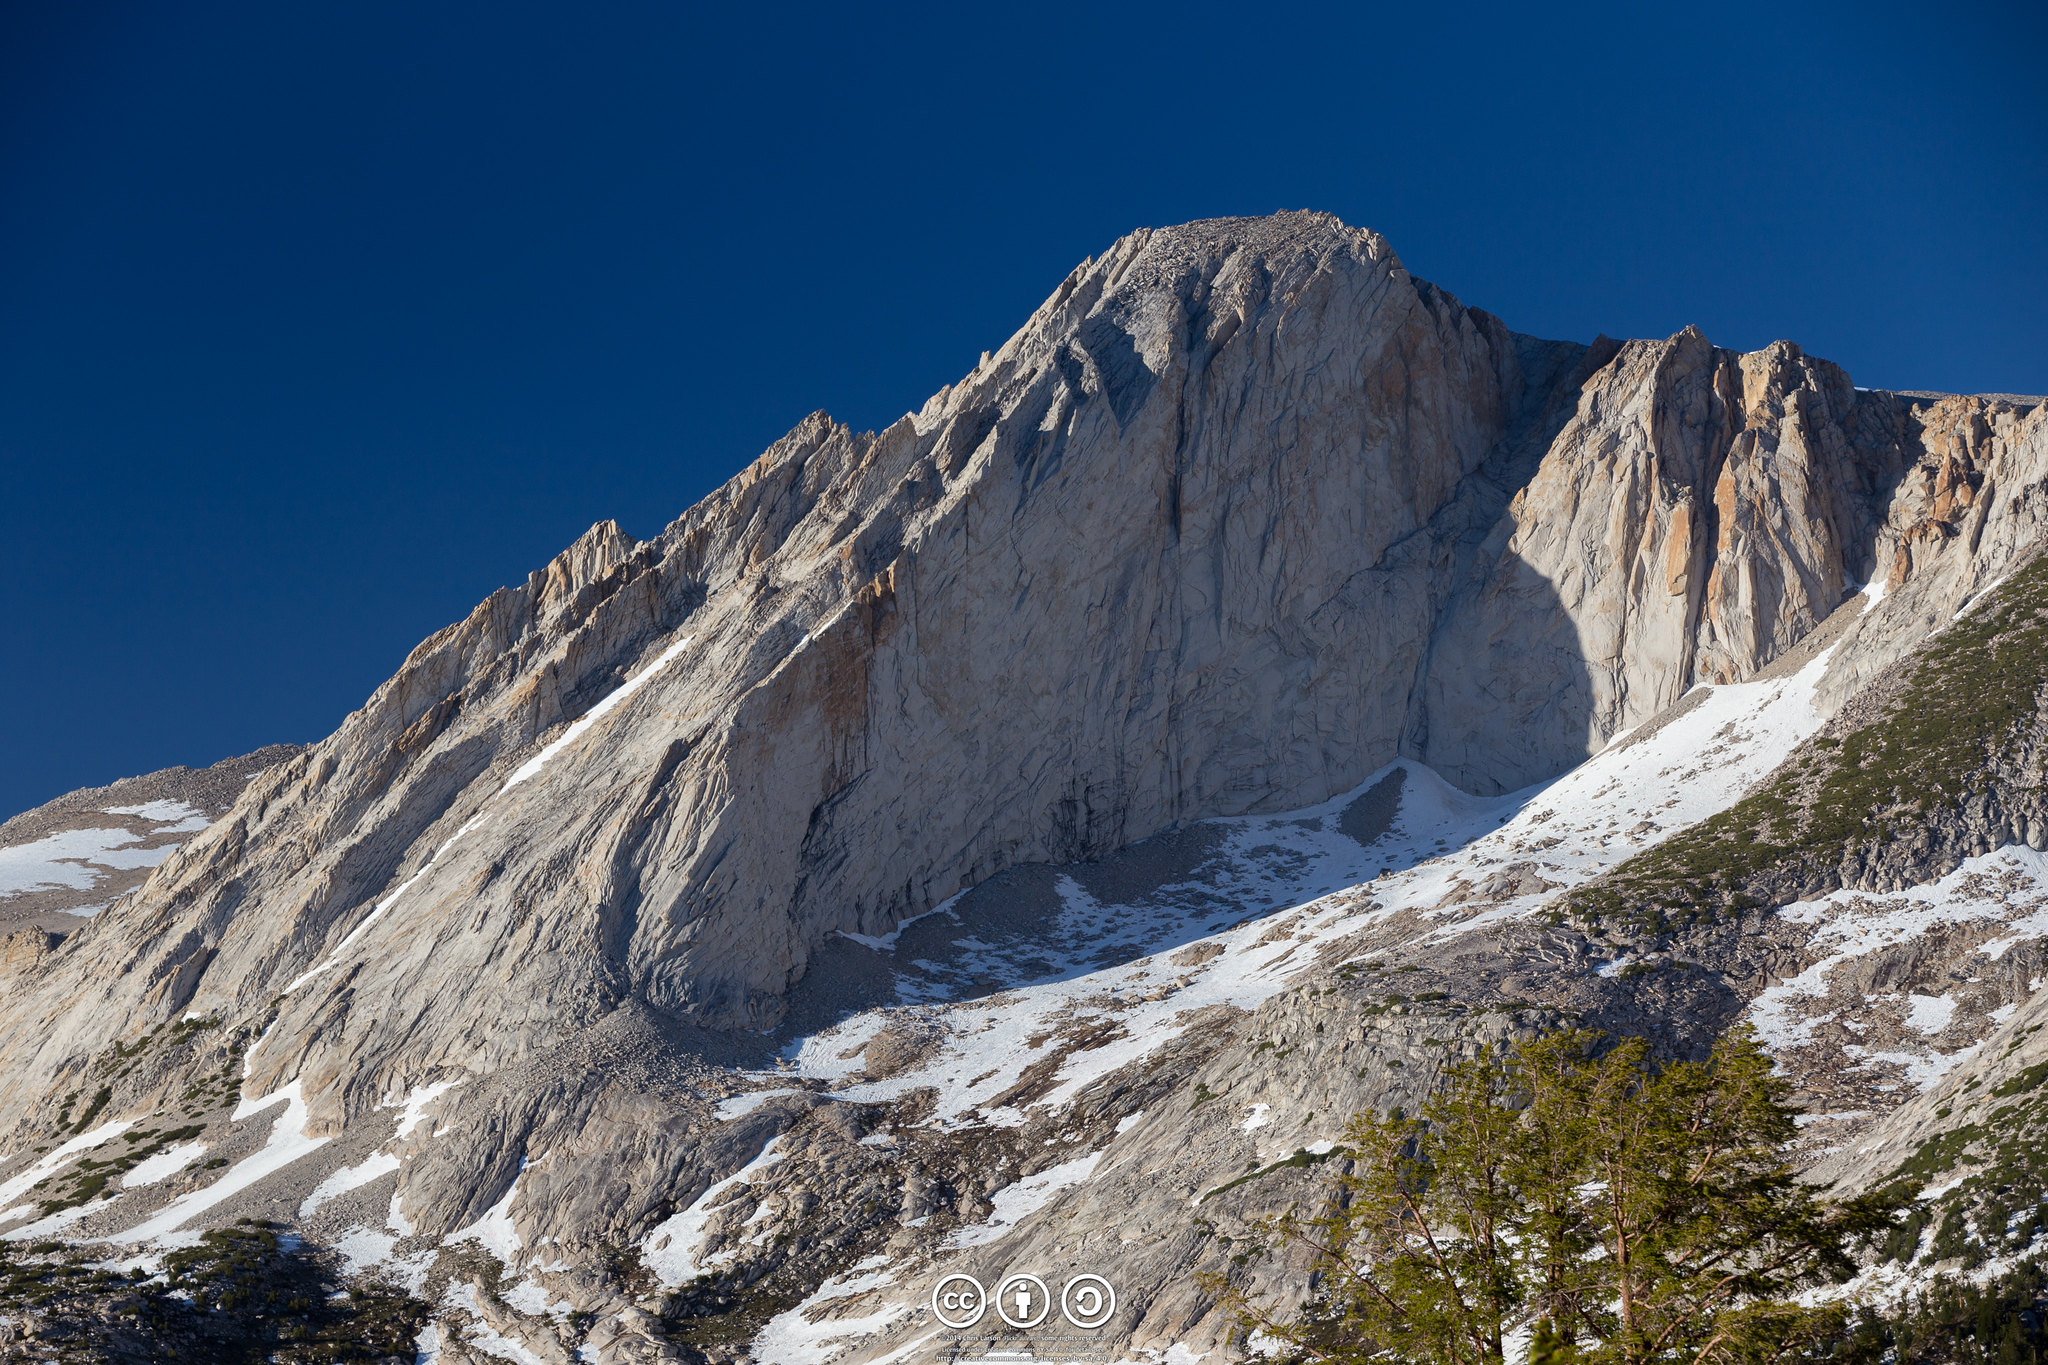
Backpacking in Yosemite is an amazing way to experience the magnitude of the park. And hitting the trail in Tuolumne Meadows, instead of the Yosemite Valley, will heighten your sense of solitude. One of the best destinations in Tuolumne Meadows is Young Lakes and Mount Conness. This three-day backpacking trip is packed full: lush meadows, swim-worthy alpine lakes, dramatic rock faces, and an exciting class three scramble to incredible views of the Sierra Nevada Range.
Start in the sup-alpine meadows and hike gradually uphill, gaining increasingly more impressive views across the valley to the Cathedral Range. Camp at one of three magnificent alpine lakes—Young Lakes—to access Mount Conness, which sits tucked back in the northeastern corner of the park. Watch the sunset on the mountain’s blocky summit, which has a magnetic draw. The next morning, set out on a climber’s trail and weave through meadows, sub-alpine forest, and past turquoise tarns. A steep rocky ascent brings you to a mind-blowing granite plateau. From here, contour the slope next to Mount Conness’s southwest face and scramble the exposed ridgeline to the summit. Mountains extend in every direction, from Boundary Peak in Nevada to the Coast Range of California.
Trip Details
Young Lakes Route
This route is longer than the trail beginning outside of the park, but it makes a fantastic multi-day backpacking trip.
Start in Tuolumne Meadows at the Lembert Dome/Dog Lake Trailhead. (You can even add in an ascent of Lembert Dome if you’re feeling bold!) Hike gradually uphill, through gorgeous meadows and sub-alpine forests, gaining views of the jagged Cathedral Range. After seven miles and 1600′ of elevation gain, arrive at the Young Lakes Basin, which sits at 10,000′. There are three lakes in total, and the lower lake is the most popular backpacking destination. Here, tucked back in the trees, you can walk to the lake for terrific views of Ragged Peak. A sandy shoreline makes the lower lake ideal for swimming. However, if you desire more privacy, continue hiking to the middle or upper lake.
Mount Conness Scramble
Head out from camp on a climber’s trail towards the Southwest face of Mount Conness. Drop into a meadow, where you’ll cross Conness Creek, before climbing again through whitebark pine forest to an alpine basin. Turquoise tarns are nestled beneath granite walls along the south slopes of Mount Conness. From here, you’ll have another steep climb up a loose talus slope to the summit plateau. Once you reach the top, a vast expanse of granite surrounds you as the peak stands tall in the distance. A final, exposed class-three scramble leads to the summit. Enjoy the 360-degree view of hundreds of mountains before retracing your steps back to camp.
Alternative Route
Hikers can access Mount Conness from various routes, including a shorter hike from Saddlebag Lake outside of the national park. This class-three scramble of the East Ridge can be completed in a day but is slightly more challenging than the Young Lakes approach.
Also, multiple technical multi-pitch routes exist for alpine climbers on all sides of the mountain.
Logistics
Trail Difficulties
You should only attempt this route climber’s trail to Mount Conness if you are a confident cross-country hiker. Cairns mark the path, but some of the ascents are loose, steep, and rocky.
The Class 3 ridgeline to the summit of Mount Conness is exposed, and it is easy to end up in more technical terrain. Know your limits and recognize that you are in the backcountry, where a misstep could be disastrous. However, the entire trek is fantastic, and outstanding views reward hikers who make it to the plateau before the summit.
Hiking Season
This trail is most accessible from July through late-September after snow has melted out in the high country.
Tioga Pass is usually open from late-May through October, depending on the snow conditions each year.
Permits
All backpackers need to get a free wilderness permit before camping in the backcountry of Yosemite National Park.
Yosemite National Park is one of the most popular backpacking destinations in the country. Reservations are not required but are recommended for popular trailheads during peak season. Reservations cost $5 per confirmed reservations, and an additional $5/hiker. If you plan to hike during this time, enter the lottery 24 weeks before you anticipate backpacking.
However, 40% of backcountry permits are first-come, first-served. So, if you don’t secure a permit in advance, head to the nearest Wilderness Center at 11 AM on the day of your intended hike.
Join a Guided Trip to Mount Conness
Guided Young Lakes—Mount Conness backpacking trips are available and are a stress-free, exciting way to get into the wilderness. The tour company handles permits, gear, transportation, meals, and provides a professional guide so you can focus 100% on enjoying your adventure. Joining a guided trip to Mount Conness can help you jump into more difficult mountain travel so that you’re pushing your comfort zone with the help of a trained backpacking guide. You can also enjoy this trip as a portered version if you’d prefer to hike with a light backpack.
6. Clouds Rest & Half Dome
Trail Overview
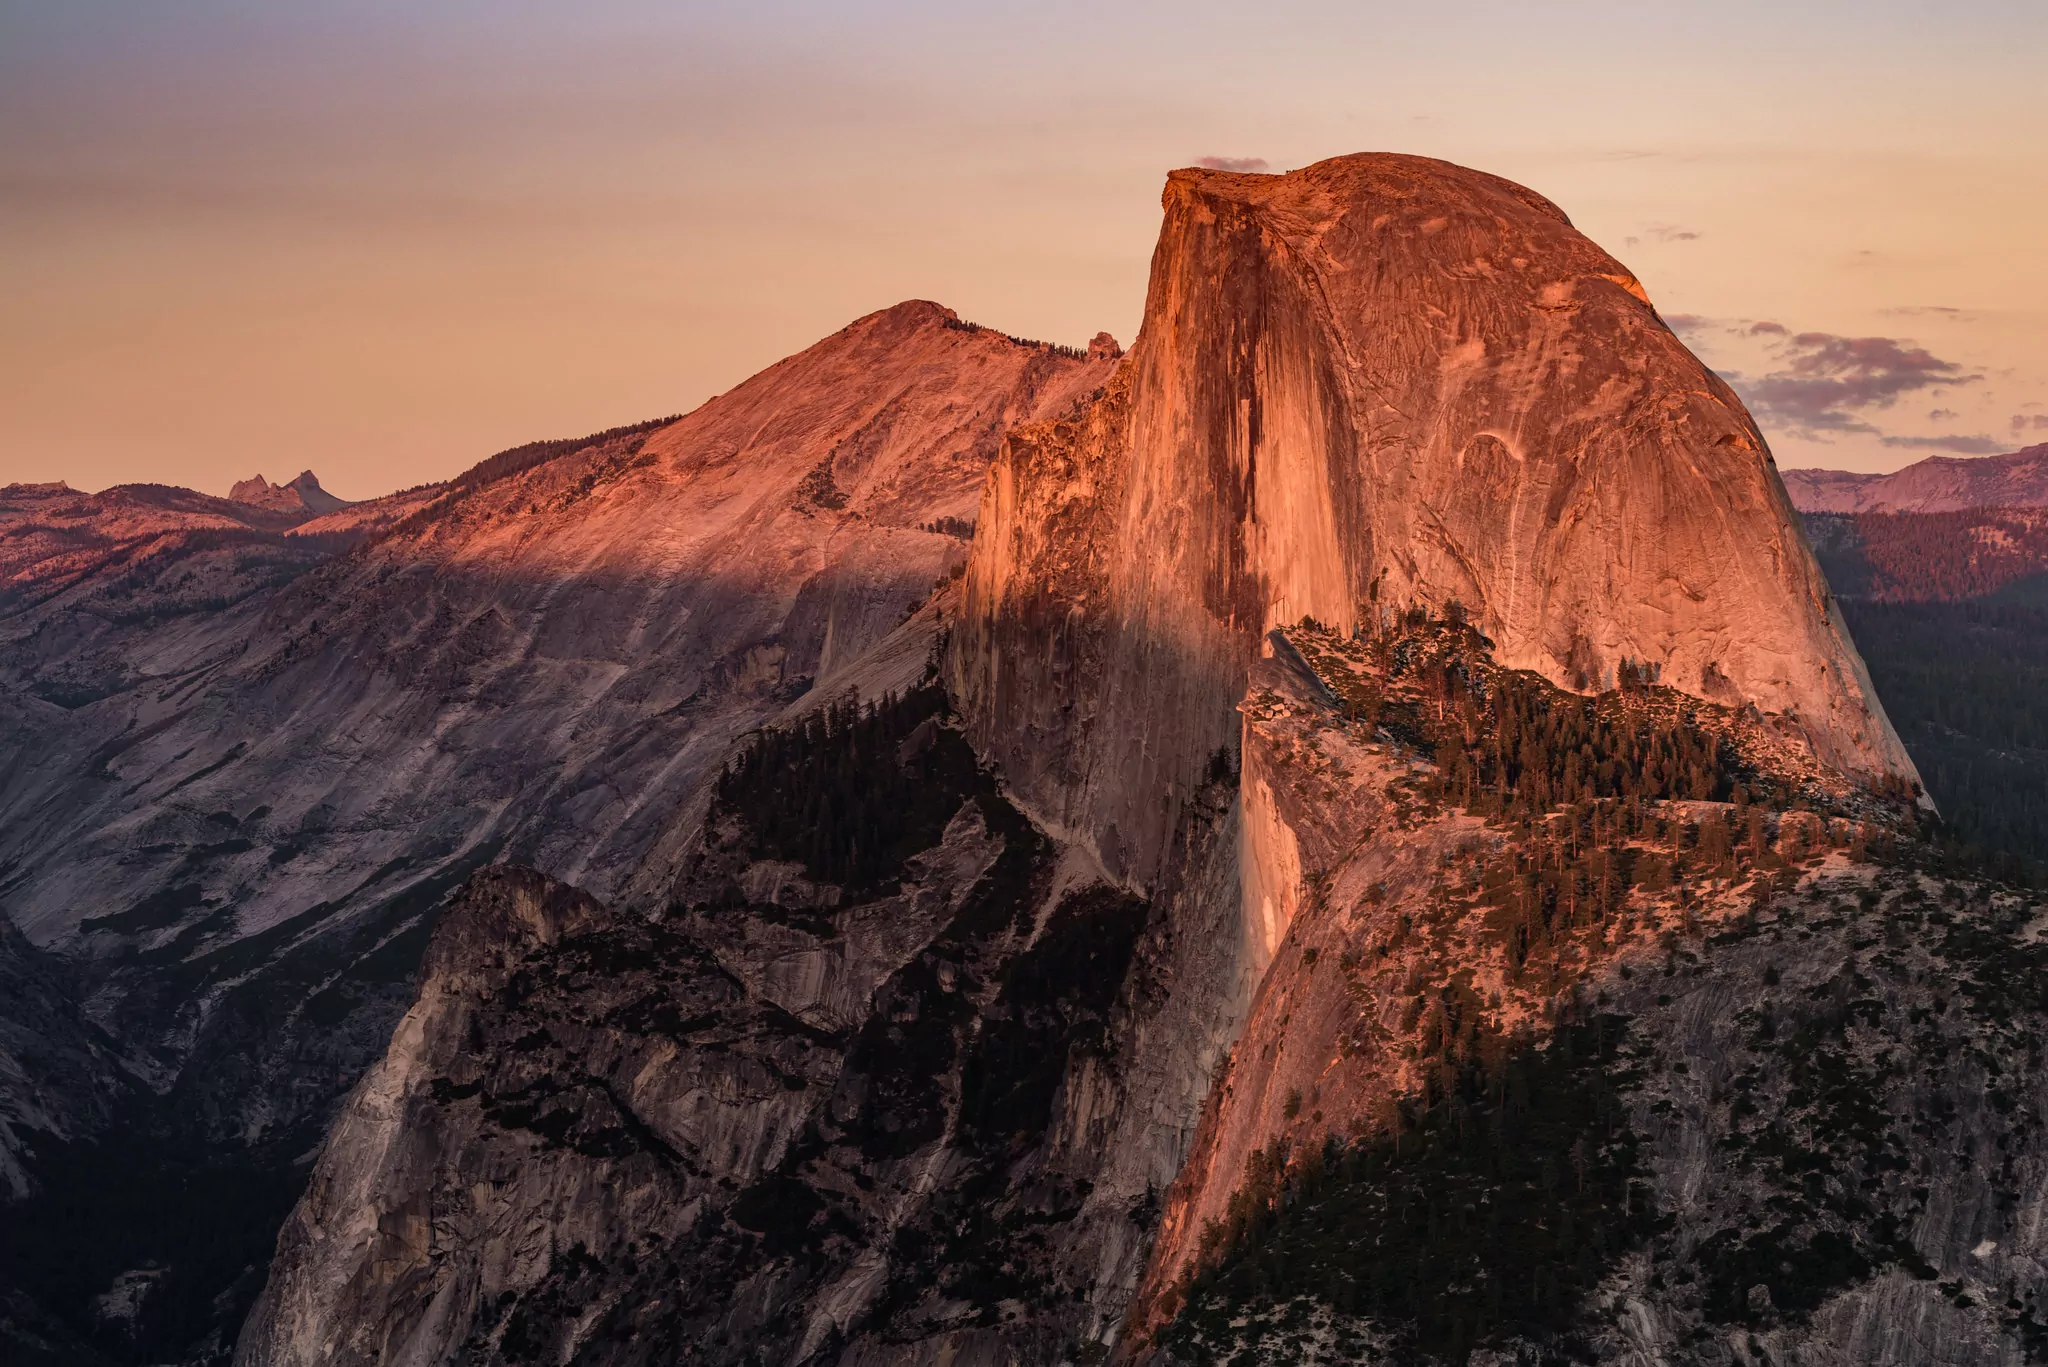
Half Dome is one of the most iconic summits in Yosemite—if not the country—so it’s no surprise that it makes this list. But what if I told you there was a way to pack two classic peaks into one backpacking trip? In less than 25 miles, you can stand atop two exhilarating summits, Clouds Rest and Half Dome, while also experiencing the park’s magnificent backcountry scenery. And while the Half Dome cables are thrilling, Clouds Rest is one of the unique destinations in the Yosemite. Its long sidewalk-esque summit (sometimes only three feet wide) provides ample exposure for adventure-seeking backpackers and day hikers.
Trail Details
Tenaya Lake Trailhead and Clouds Rest
Start your backpacking trip at the Sunrise Lakes Trailhead near Tenaya Lake off of Tioga Pass. Immediately, Tenaya Creek intersects with the trail. This creek crossing ranges from easy to exciting depending on the season. In late summer, hop across boulders to the other side of the creek. In the early season, take off your shoes and wade in thigh-deep water to the other side. Continue on the trail, enjoying the relatively flat path for the first 1.5 miles. Soon, head up steep switchbacks to a Y junction for Sunrise Lakes Basin or the Clouds Rest summit. Bear right and descend to a flat valley below Sunrise Mountain. Weave through a sub-alpine forest and across creeks until you reach a trail intersection at a little over four miles into the hike. Turn right and follow a ridge lined with Jeffrey pines until you reach the Cl0uds Rest foot trail.
Here, the trail narrows and the exposure increases. As you gain the ridge, three thousand foot dropoffs greet you on either side. Granite slabs to the north give a perspective of just how far you are above Tenaya Creek. Although the exposure is daunting, the ridgeline is flat and easy if you keep your eyes ahead of you. The true summit is wider than the ridge and makes a great destination to eat lunch on a nice day. Peaks of the entire park surround you, and if you squint, you may be able to see hikers on the cables of Half Dome.
Clouds Rest to Little Yosemite Valley
Although it may seem implausible, continue past the Clouds Rest summit, where the trail picks up and switchbacks steeply down the other side of the mountain. Hike four miles downhill to the John Muir Trail (JMT), with the Quarter Domes on your right and Moraine Dome on your left. Turn right at this junction and continue towards the communal campground of Little Yosemite Valley. This backcountry campground is equipped with bear boxes, two communal fire rings, a composting toilet, and numerous established tent pads. Embrace the social nature of this campground: join around the fire at night to meet hikers from all over the world. Chances are the discussion will be based around Half Dome, as many backpackers are either hiking towards or just finishing their summit experience.
If you didn’t obtain permits for the Little Yosemite Valley Campground, you must camp at least two miles from this camp, so at the junction with the JMT, turn left.
Half Dome Hike
Staying overnight at Little Yosemite Valley makes the hike up Half Dome a more manageable, enjoyable experience. Wake early to beat the crowds and head out of the campground back on the John Muir Trail. 1.2 miles of gradual uphill hiking returns you to the junction with the Half Dome Trail. Bear left, and continue climbing through forests as you make your way towards Sub Dome. After only 2.5 miles, you’ll reach a plateau before Sub Dome. Here, expansive views of the park open up to your right.
You’ll eventually reach a sign at the base of Sub Dome, which states that you must have a permit to hike any further on this trail. Now, your climbing gets hard. Granite steps aid your ascent, but the trail is still steep and gravelly. Place your feet with care. Take a minute to turn around as see Clouds Rest in the distance. As you crest the top of Sub Dome, you stare straight at the seemingly-vertical Half Dome cables. This view is the most fear-inducing, but the angle is far more mellow than it appears from afar.
The Cables
Put on your gloves and gear up for the climb. If you plan to leave any packs behind, make sure you’re taking all your snacks with you. Marmots and chipmunks hang around the base of the cables looking for easy snack access. Start up the cables, finding your flow and comfortable hand positioning. Focus on your feet and use your arms to help you balance. Take your time and enjoy the adrenaline-fueled adventure. Once you arrive at the summit, take a breath and enjoy the views. The top of Half Dome is the size of a football field, so there is plenty of room to run around and explore, while you feel like you’re on top of the world.
Pro Tip #1: The earlier you make it to the summit, the easier your descent will be. The cables get crowded as Half Dome day hikers flock after 11 AM.
Pro Tip #2: Make sure your shoes are up for the task—they should have decent tread. You may see day hikers attempting to summit Half Dome in flimsy running shoes, but we don’t advise this!
Mist Trail or John Muir Trail
From Little Yosemite Valley, you have two options to get to the trailhead. You can take the scenic Mist Trail, which takes you in the spray of both Nevada Falls and Vernal Falls. This trail is shorter but incredibly steep. Large steps of granite take you winding down the canyon for over 1800 feet in only a mile and a half. This trail is beautiful, but hard of the joints under the load of a heavy pack.
If your legs are dead from the past few days of hiking, you may want to opt for the John Muir Trail back to the Yosemite Valley. This trail is longer mileage than the Mist Trail, but its a more gradual descent. This trail is less populated and also offers impressive views of Nevada Falls from above. It connects with the Mist Trail below Vernal Falls, so you can still check out this waterfall without adding on too much extra mileage.
Logistics
Hiking Season
The trailhead for Clouds Rest lies on Tioga Pass, which is usually open from late-May through October depending on the snow conditions each year.
In addition, the National Park Service installs the Half Dome cables around late-May every spring and takes them down by October. Hikers should only attempt to climb Half Dome when the cables are in place.
Half Dome Permits & Fees
Permits are required for all day-hikers and backpackers planning to summit Half Dome.This is one of the most coveted permits in the entire country-wide National Park System, so apply during the preseason lottery (March 1st – 31st) for the best chance to secure a permit. There is a $10 application fee per party. If you do get the chance to hike Half Dome, you will pay $10/person for the permit.
If you didn’t get a spot in advance, you can try to obtain a permit once you are at Yosemite National Park. Enter the daily lottery two days before you want to hike Half Dome.
If you don’t obtain a Half Dome permit, hiking to Clouds Rest alone is a worthy alternative. Multiple loop options exist along Tioga Pass from the Tenaya Lake trailhead, so check out a map and explore your options!
Additional Permits & Reservations
All backpackers need to get a free wilderness permit before camping in the backcountry of Yosemite National Park.
Yosemite National Park is one of the most popular backpacking destinations in the country. Reservations are not required but are recommended for popular trailheads during peak season. Reservations cost $5 per confirmed reservations, and an additional $5/hiker. If you plan to hike during this time, enter the lottery 24 weeks before you anticipate backpacking.
However, 40% of backcountry permits are first-come, first-served. So, if you don’t secure a permit in advance, head to the nearest Wilderness Center at 11 AM on the day of your intended hike.
Hike Yosemite’s Classic Summits on a Guided Trip!
Don’t want to mess with the Yosemite permit system? Guided Clouds Rest and Half Dome backpacking trips are available and are a stress-free, exciting way to get into the wilderness. The tour company handles permits, gear, transportation, meals, and provides a professional guide so you can focus 100% on enjoying your adventure.
Wildland Trekking Hiking Adventures
As the world’s premier hiking and trekking company, Wildland believes in connecting people to fantastic environments in amazing ways. Wildland Trekking Company offers an array of incredible hiking and trekking experiences in 9 states and 11 countries. Read more about our world-class destinations.
To learn more about our guided backpacking trips and all of our award-winning hiking vacations, please visit our website or connect with one of our Adventure Consultants: 800-715-HIKE.

