


5 Best Yosemite Backpacking Trips
Jump to:
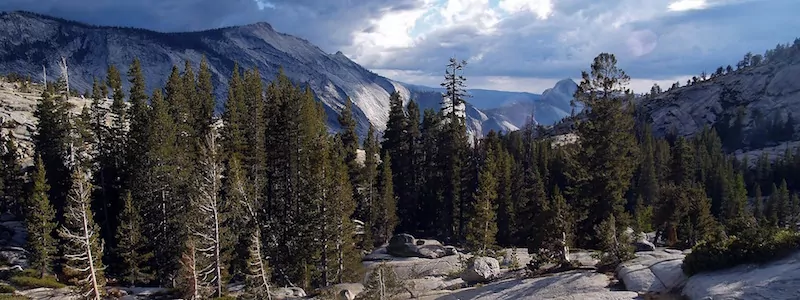
Explore the 5 best backpacking trips in Yosemite! Yosemite National Park offers adventurous visitors an abundance of options for exploring the backcountry of the Sierra Nevada Mountains. The Sierra Nevadas, also known as “The Range of Light,” are known around the world for their glacier-polished granite, towering cliffs and monoliths, beautiful high country, and spectacular hiking trails leading to remote alpine lakes, serene streams, and incredible camping.
We are experts on hiking and we’re experts on Yosemite! Here we have selected our 5 favorite Yosemite backpacking trips and detailed them so you can learn more and plan an unforgettable trip.
All-inclusive Yosemite Backpacking Trips
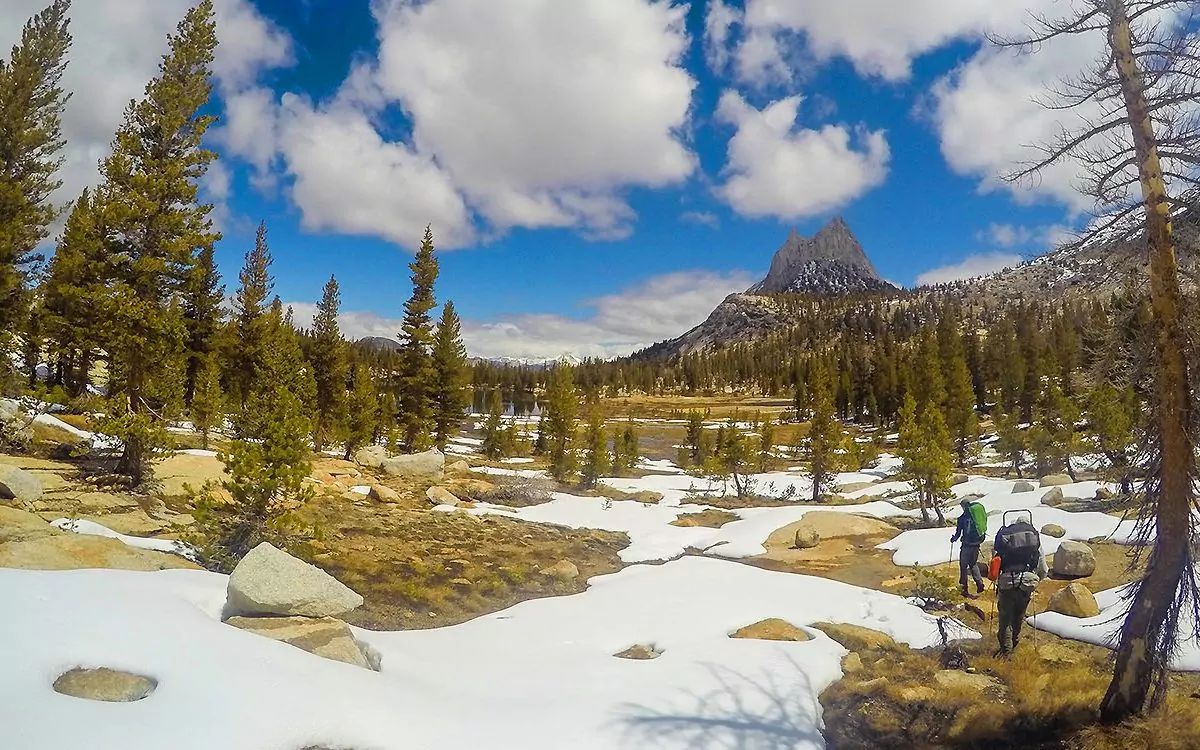
1. Yosemite’s Classic Summits
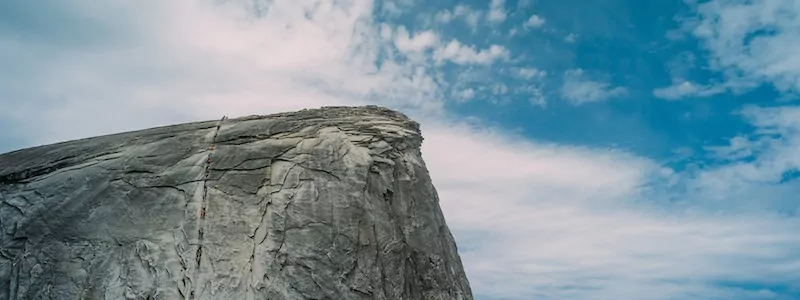
This trip spans a wide swath of Yosemite geography. Start at the west end of placid Tenaya Lake at the Sunrise Lakes trailhead. If in the early season, be prepared to ford Tenaya Creek as it leaves the lake, or cross the well-placed boulders should water levels allow. You’ll eventually climb around a 1,000 feet to a forested plateau, and look to camp among the trail’s namesake trio of small alpine lakes. Geographic standouts abound on this up-and-down backpacking trip, including the narrow, blocky top of 9,000+’ Cloud’s Rest, the always-thrilling, unmissable peak of Half Dome (fun fact: it was never a “full dome”), and the mist-blanketed, plummeting Nevada and Vernal Falls.
Trip Overview
Yosemite backpacking permits are essential to this adventure, as Half Dome is highly regulated to no more than 300 people per day to ensure the safety of those climbing the seasonally-placed cables. The campsites around Half Dome are often tough to get. Act fast.
Both Cloud’s Rest and Half Dome offer incredible vistas of the surrounding Sierra mountainscape, as well as challenging but not difficult hiking.
This trip is ideal for the fall, when backcountry campsites and trails are less crowded, and the mid-afternoon thunderstorms of summer have dissipated.
Camping is pristine on this route and includes snoozing under open skies, streamside campfires (depending upon fire regulations) and a good chance to spot one or many of Yosemite’s well-known black bears.
Getting There
The trail starts at Sunrise Lakes Trailhead at the west end of Tenaya Lake on Route 120 and ends back in Yosemite Valley. This makes it easy to be shuttled to the trailhead, avoiding the need to park and retrieve a car after the hike.
The park’s shuttle system to and around Tuolumne Meadows did not operate in 2018. Contact the park to confirm 2019 operation.
To get to Sunrise Lakes Trailhead:
From Yosemite Valley:
From the seven-by-one-mile Yosemite Valley, take Route 140 toward Crane Flat, then follow signs for Toulumne Meadows on Route 120 east. Sunrise Lakes trailhead is on the west end of Tenaya Lake, on your right.
From Lee Vining, CA:
Travel west on 120 over Tioga Pass to the park entrance. Tenaya Lake is about 16 miles into the park, west of Tuolumne Meadows right next to the road. Lot will be on your left at the western tip of the lake.
From Bay Area:
Head east on 205 to 120 east through Manteca, Oakdale, and Groveland. Enter the park at Big Oak Flat. Follow signs for Tuolumne Meadows on 120 east. Trailhead will be on your right.
Recommended Day by Day Itinerary
Day 1: Gather in Half Dome Village on the deck for pizza and maybe a beer or two. Review your route, discuss expectations, double-check gear, then crash at the Backpacker’s Camp, just over Tenaya Creek beyond North Pines Campground.
Day 2: Park or shuttle to Sunrise Lakes Trailhead. Take the well-worn trail across Tenaya Creek, along a relatively moderate stretch of forest, up a series of switchbacks for close to 1000′, following signs to Sunrise Lakes. About 5 miles. Camp at any of the three easy-to-find lakes, using an already impacted tent pad.
Day 3: Backtrack slightly west to the intersection, taking the Forsyth Trail toward Cloud’s Rest. Summit Cloud’s Rest via its footpath, being aware of any incoming storm clouds. Lunch and snacks are always better with this kind of view. Descend its west slope to Cloud’s Rest Trail, following it down, down, down until it meets the John Muir Trail. Many campsites and water sources are located at this juncture, especially within the adjacent stands of forest. Expect to gain about 1000′ and lose 2600′ in about 6 miles.
Day 4: Secure your food, and leave your tents and overnight gear to make a morning dash up Half Dome before the selfie crowds stall on the cables. Follow the JMT briefly toward the Valley, cutting right at the signed intersection for Half Dome. Climb the sub-dome, rest your quads, then start up the great granite challenge. Should you summit without issue, an early afternoon nap, aided by the satisfaction of having conquered the cables, awaits you back at camp. Expect to hike between 5 and 6 miles, gaining and losing 2700′.
Day 5: You’ll lose about 2000′ in the 5 miles back to the valley. Head toward the valley along the JMT, stopping in Little Yosemite Valley for your first views of the mighty Merced River. Walk along the shaded path until reaching the cusp of Nevada Fall at just under 6,000′. Continue on Vernal Fall, using either the fern-soaked Mist Trail to edge the falls or stay high on the JMT, working your down to the paved Mist Trail, where throngs of day hikers welcome you back to the valley
Permits, Fees, and Reservations
Yosemite National Park backpacking trip permits are based on a trailhead quota (number of people entering a trailhead). Each trailhead has different limits. Be prepared to alter your route in some way.
You’ll need to secure one of 300 daily permits allotted for Half Dome.
Reservations are required by the park service for each night you camp and can be applied for any time from within 28 weeks of your start date. The backpacker’s camp in Yosemite Valley is a walk-up, but limited in space and requires diligent registration and presentation of your paperwork.
Carry your permit with you at all times. They cost $5.
When to go and what to think about
This trip is an ideal summer or fall adventure. Spring and early summer often entail snow- and ice-covered granite, and high or difficult creek crossing.
Bears
Black bears in Yosemite are a serious concern, but not necessarily because they pose a threat to hikers.
The problem is our food, and our collective lack of understanding of just how crafty these bruins can be. Abide fully by the park’s regulations for food storage. Be more careful than you think you need to be, and always be ready to prove to a Ranger that your food is secure, even when you’re in camp. They do not issue warnings, only citations. There are no grizzlies in Yosemite.
Afternoon Storms
Cloud’s Rest and Half Dome are high, exposed peaks renowned for lightning strikes and stranding unprepared hikers. Do not attempt to summit if storm clouds are visible, and especially if you hear thunder. The best way to avoid missing your summit bid is to start hiking early.
The Merced River is clear, cold, and often deadly. When at the view points above Nevada and Vernal Falls, do not attempt to swim or even wade into the river. It’s okay to soak hot feet, but do not enter the river above either of the Falls, and especially along the Silver Apron or near the Emerald Pool above Vernal.
Hike This Trip with a Guide
Guided Yosemite Classic Summit trips are available, and are a stress-free, exciting way to do this trip. The tour company handles permits, gear, transportation, meals, and provides a professional guide so you can focus 100% on enjoying your adventure. Or read more about all of our Yosemite backpacking trips.
2. Tuolumne River Canyon
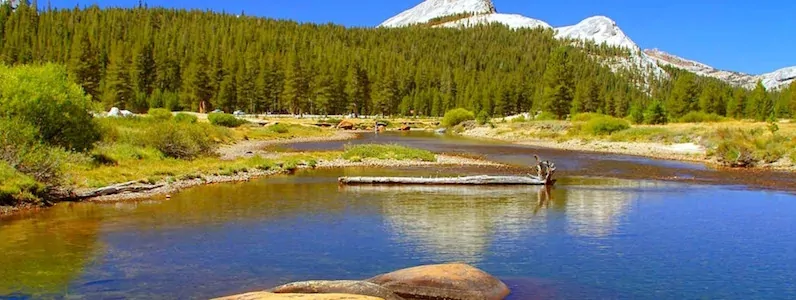
Tuolumne Meadows is a series of connected, granite strewn sub-alpine meadows in Yosemite’s northeast section. Known for its namesake river and sprawling, wondrous landscape, Tuolumne is a destination for the true lover of Yosemite. However, things get more adventurous after leaving the serene meadows and a respite at the more secluded Glen Aulin district. The classic, “V” canyon soon gets steep and stunning, with towering granite walls forced apart by the cold fury of the river and its series of heavy waterfalls, swirling pools, and thrashing rapids.
Trip Overview
This was a “classic” John Muir trail, meaning it was established under daunting, pioneering circumstances. That said, today’s more formal trail helps make this great Yosemite backpacking trip easier to tackle. The first six miles are along the famed Pacific Crest Trail and meandering Tuolumne River. From just under 8,000′ at Glen Aulin, the hike runs down canyon, losing more than 3,000 feet in elevation in about 8 miles. The hike continues riverside to Pate Valley, leaving another 900 or so feet of elevation behind—but that doesn’t last long. The final day’s ascent to the Tuolumne Canyon rim will spike heart rates, and your love for this incredible place.
Getting There
The hike starts at Glen Aulin Trailhead just before Lembert Dome and east of Tuolumne Meadows visitor center.
From Yosemite Valley
From the seven-by-one-mile Yosemite Valley, take Route 140 toward Crane Flat, then follow signs for Toulumne Meadows on Route 120 east. Glen Aulin trailhead is directly on 120, about equidistant between Tuolumne Meadows visitor center and the district ranger station.
From Lee Vining, CA
Travel west on 120 over Tioga Pass to the park entrance. Watch for signs for the Tuoulmne Meadows ranger station and Lembert Dome trailhead. Glen Aulin is shortly after Lembert.
From Bay Area
Head east on 205 to 120 east through Manteca, Oakdale, and Groveland. Enter the park at Big Oak Flat. Follow signs for Tuolumne Meadows on 120 east. Glen Aulin trailhead is directly on 120, about equidistant between Tuolumne Meadows visitor center and the district ranger station.
Recommended Day by Day Itinerary
Day 1: If you need time for last-minute logistics or group gathering, spend night one in Yosemite Valley, at the Backpacker’s Camp outside North Pines Campground. If that doesn’t apply, drive to Tuolumne Meadows and launch from the Glen Aulin trailhead to end the day at the backpacker’s camp at Glen Aulin High Sierra Camp, gaining a mere 200′ and losing 800′ over about 6 miles.
Day 2: All about the waterfalls. Hike down canyon to take in California Falls, La Conte, and the renowned Waterwheel. Establish camp a few miles beyond the falls above Muir Gorge. This day is a little over 8 miles and gains 500′ while losing 3,000!
Day 3: Continue along the river for 8.3 miles, taking in streams and river pools on your way into Pate Valley, where you’ll find camp for the night and finish having gain 600′ and losing 1500′.
Day 4: Stretch well after breakfast, and start the steep ascent up the Tuolumne Canyon, and out to White Wolf and back to Tioga Rd./Route 120. This is a big day, you’ll lose about 200′ while gaining … wait for it … 3,700′.
Permits, Fees, and Reservations
Yosemite National Park backpacking trip permits are based on a trailhead quota (number of people entering a trailhead). Each trailhead has different limits. Be prepared to alter your route in some way.
Reservations are required by the park service for each night you camp and can be applied for any time from within 28 weeks of your start date. The backpacker’s camp in Yosemite Valley is a walk-up, but limited in space and requires diligent registration and presentation of your paperwork.
Carry your permit with you at all times. They cost $5.
When to go and what to think about
This is a great mid-summer trip, which allows for snow to melt through the meadows and for the spring thaw to somewhat level out and for pools to be safely swimmable, when applicable. The fall is also ideal, as it is for most Yosemite trips.
Bears
Black bears in Yosemite are naturally timid, and in most cases will retreat when encountered. However, available food may alter their behavior. Store your food and all scented items carefully, even when at camp. Rangers do not hesitate to dole out citations. There are no grizzlies in Yosemite.
Waterfalls
Waterfalls make better pictures than tombs, so pay them serious respect on this trip. You will be close enough to swim in many of the pools and eddies along the river, and only a few of them will be safe if encountered in early seasons. Extreme caution is always advised around the rocky falls and their tempting pools.
Hike this Trip with a Guide
Guided Grand Canyon of the Tuolumne backpacking trips are available, and are a stress-free, exciting way to do this trip. The tour company handles permits, gear, transportation, meals, and provides professional Yosemite trekking guides so you can focus 100% on enjoying your adventure.Or read more about all of our guided Yosemite backpacking trips.
3. The North Rim of Yosemite Valley

Yosemite Valley, seven miles long by one wide, and once home a band of Miwok Native Americans who took the name Ahwahnechee after their word for the valley itself, is where this hike begins and ends. However, there is no other way to the valley’s rim except up, and that’s where the cliff-carved switchbacks of Snow Creek Trail take you. From there it’s an undulating couple of days along the forested terrain along the edge of the famed valley, then back down along the continent’s tallest waterfall.
Trip Overview
This hike has it all, from the customary life-list vistas of Yosemite to thundering waterfalls. The 3,000 feet or so in elevation you’ll gain right out of the gate will have you second guessing your training program, but give your quads some leeway, because the trail relaxes a bit once on top. Highlight include the peak of North Dome, Yosemite’s lone natural arch, and Yosemite Falls in all its raging, spilling glory. Streams, serene campsites, and forested Sierra Nevada forest abound along the North Rim.
Getting There
The hike starts at Snow Creek Trail just beyond Mirror Lake in Yosemite Valley.
From Fresno
Route 41 north enters the park at its South Entrance near Mariposa Grove and Wawona Visitor Center. Follow signs for Yosemite Valley. The Valley shuttle drops off hikers at the trailhead for Mirror Lake, which will junction with Snow Creek.
From Lee Vining, CA
Travel west on 120 over Tioga Pass to the park entrance. Follow signs for Yosemite Valley, taking a left on Big Oak Flat at Crane Junction, following signs to Yosemite Valley. Use the park shuttle to the Mirror Lake trailhead.
From Bay Area
Head east on 205 to 120 east through Manteca, Oakdale, and Groveland. Enter the park at Big Oak Flat. Follow signs for Yosemite Valley. Once there, park at the visitor center and use the shuttle to reach the trailhead.
Recommended Day by Day Itinerary
This trip could be considered 4 days if you travel to the valley the day before your trip. Consider staying at the backpacker’s camp beyond North Pines campground.
Day 1: Start on the trail to Mirror Lake in Yosemite Valley, aiming to beat the switchbacks of the Snow Creek Trail. Once up on the rim, head another mile or before finding camp along Snow Creek. Get ready to climb, as this day loses no elevation and gains 3000′ over in 4.5 miles.
Day 2: Shoot for North Dome today, but not before winding around to stand on Indian Rock and taking in the park’s only natural, granite arch. If you make North Dome, ease into camp off trail along Indian Canyon Creek. Expect to trek about 8 miles, gaining 2300′ and giving back 2100.
Day 3: Follow the trail slightly south toward the rim and Castle Cliffs, winding around to Yosemite Creek and the cusp of Yosemite Falls. The trail winds down the west side of the falls, switches back, and careens to the valley floor, just outside famous Camp 4 in about 6.5 miles. You’ll gain 1000′ early and drop 3000′.
Possible Day 4: You can layover a day at Snow Creek to explore places like the Snow Creek Cabin or the top of Mount Watkins. Or, stay another along Yosemite Creek and take a run at El Cap or summit Eagle Peak.
Permits, Fees, and Reservations
Yosemite National Park backpacking trip permits are based on a trailhead quota (number of people entering a trailhead). Each trailhead has different limits. Be prepared to alter your route in some way.
Reservations are required by the park service for each night you camp and can be applied for any time from within 28 weeks of your start date. The backpacker’s camp in Yosemite Valley is a walk-up, but limited in space and requires diligent registration and presentation of your paperwork.
Carry your permit with you at all times. They cost $5.
When to go and what to think about
This can be an early-season hike as spring brings warm sun on the rim, and the falls are at their best. Outside of early spring after big winters, this is a great hike throughout the warm seasons well into autumn.
Bears
Remember, keep all food stored properly in provided bear boxes or in hard-sided storage containers, away from camp. Be diligent.
Cliff Hazards
Snow Creek Trail is steep and has the potential to be deadly if the established trail is not respected. Yosemite Falls overlook is extremely exposed in places and can be scary for those more comfortable at sea level. Abide by all Park signage, and remember: your selfie isn’t worth it.
Thunderstorms
Exposed granite areas above the valley are magnets for lightning strikes. Be aware of weather, avoid high places in summer afternoons, and always have a plan on where to go should you need to take cover in a hurry.
Hike Yosemite’s North Rim with a Guide
Guided Yosemite North Rim backpacking trips are available, and are a stress-free, exciting way to do this trip. The tour company handles permits, gear, transportation, meals, and provides a professional guide so you can focus 100% on enjoying your adventure.Or read more about all of our Yosemite backpacking tours.
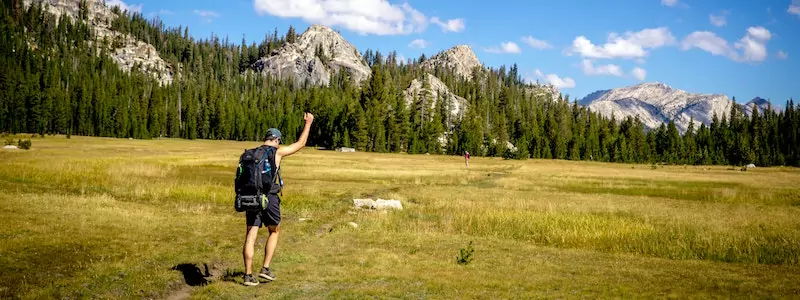
4. The High Sierra Loop
What’s not to love about this hike? The vastness of the mighty Sierra Nevadas? Open sky camping? Solitude? The boxes all check. This trip explores the peaks and ridges of Yosemite’s literal high points. The venture starts in the flower-adorned Tuolumne Meadows and climbs into the Cathedral Range, visits an array of alpine lakes, traipses along the Pacific Crest and John Muir trails and provides more natural inspiration than a TED talk.
Trip Overview
Lyell Canyon takes hikers south from Tuolumne along the PCT/JMT, tracing the Tuolumne River before heading up 2000′ into a pinch below Potter Point, and into the beautiful grip of the Cathedral Range. The trail heads slightly southwest, passing the Vogelsang High Sierra Camp, following a large loop that touches an array of 10,000’+ lakes and forces hikers to take … it … slow as the cool Sierra air thins with each step. The route finishes back at the starting point.
Getting There
The hike starts at Lyell Canyon in the heart of Tuolumne Meadows, across from Lembert Dome and near the ranger station.
From Lee Vining, CA
Travel west on 120 over Tioga Pass to the park entrance. Follow signs for Tuolumne Meadows. Look for Lyell Canyon signage just after the Lodge, on the left.
From Fresno
Route 41 north enters the park at its South Entrance near Mariposa Grove and Wawona Visitor Center. Follow signs for Yosemite Valley, then take Big Oak Flat Rd. out of the valley toward Crane Flat, where you’ll head east on 120. The Lyell Canyon trailhead is in the campground near the Tuolumne Meadows lodge and ranger station.
From Bay Area
Head east on 205 to 120 east through Manteca, Oakdale, and Groveland. Enter the park at Big Oak Flat. Follow signs for Tuolumne Meadows and 120 east. The Lyell Canyon trailhead is in the campground near the Tuolumne Meadows lodge and ranger station.
Recommended Day by Day Itinerary
Day 1: Take off south into Lyell Canyon on the Pacific Crest Trail/John Muir Trail. You’ll follow the Lyell Fork of the Tuolumne River. Camp at the junction with Ireland Creek after 6 miles and gaining 200′.
Day 2: Head up/west on the Ireland Creek Trail toward Ireland Lake, but splitting off toward Evelyn Lake and Vogelsang. Your goal for the day is the shore of 10,300′ Vogelsang Lake in 7 miles. Consider a summit of Vogelsang Peak at above 11,000′. In total, this day includes 1700′ of elevation gain and only 300′ lost.
Day 3: Moderate day. Hike along Lewis Creek, head north again to Babcock Lake, and seek a lower camp at Emeric Lake in about 3.2 miles. You’ll drop down 1000′.
Day 4: Complete the loop back to Vogelsang, but break off north along Rafferty Creek, up and over Tuolumne Pass, and on down to the trailhead for a 9.4 mile day. But, while gaining 700′ early, you’ll lose 1300 when done.
Permits, Fees, and Reservations
Yosemite National Park backpacking trip permits are based on a trailhead quota (number of people entering a trailhead). Each trailhead has different limits. Be prepared to alter your route in some way.
Reservations are required by the park service for each night you camp and can be applied for any time from within 28 weeks of your start date.
Carry your permit with you at all times. They cost $5.
When to go and what to think about
This is a trip for the warmer seasons when the snow is mostly melted and risk of spring snowstorms is at a minimal, although they can happen well into June and sometimes July. Ultimately, this is a late summer and fall trip.
Thunderstorms
Weather is a special concern on this trip given the elevation and open sections of trail. Take extra precaution when exploring nearby peaks in the afternoon, and also be prepared for all kinds of weather, even snow, year-round. The mountains are unpredictable.
Bears
Similar to recommendations for the other Yosemite backpacking trips in this guide, bears are always an issue in Yosemite, and being in higher elevations doesn’t mean food storage restrictions relax. Wildlife use trails, too.
Hike Yosemite’s High Sierra Loop with a Guide
Guided Yosemite High Sierra Loop backpacking trips are available, and are a stress-free, exciting way to do this trip. The tour company handles permits, gear, transportation, meals, and provides a professional guide so you can focus 100% on enjoying your adventure.Or read more about all of our guided Yosemite backpacking trips.
5. Young Lakes and Mt. Conness
Tuolumne Meadows is a subalpine stretch of grassy, river- and creek-strewn Sierra Nevada meadows that offers inroads to some of the region’s premier hikes and wilderness destinations. In this case, follow established trail to the collection of cool, 10,000′ Young Lakes, beyond which the summit of talus-laden Mt. Conness awaits. High along its banks, views will be too inspiring to take in with a camera, no matter how steady your hand or keen your eye.
Trip Overview
Leaving from Tuolumne Meadows at the Glen Aulin trailhead, this hike climbs steadily through the meadows, beyond Dog Lake and enters open, flowering landscapes before a last push into the Young Lakes Basin. The trip goes off-trail for those looking to summit Mt. Conness. While within view and generally easy to navigate, don’t attempt this hike if you’re not comfortable with being outside the limits of park-maintained signage and established trekking routes. The climb is steep at times but mostly moderate, as well as breathtaking. You won’t soon forget what’s visible from the flanks of the mountain.
Getting There
This hike starts at the Glen Aulin trailhead in Yosemite’s Tuolumne Meadows, directly on route 120/Tioga Rd. through the north section of the park.
From Lee Vining, CA
Travel west on 120 over Tioga Pass to the park entrance. Follow signs for Tuolumne Meadows. Look for Glen Aulin signage just after the lodge and Lembert Dome.
From Fresno
Route 41 north enters the park at its South Entrance near Mariposa Grove and Wawona Visitor Center. Follow signs for Yosemite Valley, then take Big Oak Flat Rd. out of the valley toward Crane Flat, where you’ll head east on 120. The Glen Aulin trailhead along 120 on the left, after the Tuolumne Meadows visitor center.
From Bay Area
Head east on 205 to 120 east through Manteca, Oakdale, and Groveland. Enter the park at Big Oak Flat. Follow signs for Tuolumne Meadows and 120 east, passing Tenaya Lake. Glen Aulin trailhead is past the visitor center, just beyond the campground.
Recommended Day by Day Itinerary
Day 1: Once in Tuolumne Meadows, the Glen Aulin trail starts just west of Lembert Dome. Follow signs toward Dog Lake, then go due north to the Young Lakes Basin, for a day-total of about 7 miles, a gain of 1600 feet, a loss of only 300′.
Day 2: Establish a base camp at Lower Young Lake, and target the summit of Mt. Conness, the park’s seventh-highest peak. It’s off-trail, but fairly moderate third-class scrambling. It’s up and down 2600′ over 8 miles.
Day 3: Back to the trailhead; consider the west fork of the trail back to the PCT for a short stretch before finishing up at route 120 after losing 1500 feet for 7.3 miles.
Permits, Fees, and Reservations
Reservations are required by the park service for each night you camp and can be applied for any time from within 28 weeks of your start date.
The park bases permit assignments on the number of people entering per trailhead. Routes can often be tackled from multiple trailheads. Young Lakes can be reached via Glen Aulin or Dog Lake.
Carry your permit with you at all times. They cost $5.
When to do this Trip
Given the summit attempt of Mt. Conness, this is a trip left best for late summer and fall.
Thunderstorms
Do not approach the higher sections of Mt. Conness if a summer storm is within sight. Use extra caution and be ready to descend quickly should weather move in quickly.
Bears
Water sources are often frequented by wildlife, and bears are a common sight in Yosemite. Secure all food and scented items at all times, even when at camp.
Hike to Young Lakes and Mt. Conness with a Guide
Guided trips to Yosemite’s Young Lakes and Mt. Conness are available, and are a stress-free, exciting way to do this trip. The tour company handles permits, gear, transportation, meals, and provides a professional guide so you can focus 100% on enjoying your adventure.Or read more about all of our Yosemite backpacking tours.
guided mount Conness backpacking trips
Wildland Trekking Yosemite Hiking Adventures
As the world’s premier hiking and trekking company, Wildland believes in connecting people to fantastic environments in amazing ways. Yosemite National Park offers an array of incredible hiking and trekking experiences. Wildland Trekking provides many different multi-day hiking and backpacking adventures in Yosemite.
To learn more about our guided backpacking trips and all of our award-winning hiking vacations, please visit our website or connect with one of our Adventure Consultants: 800-715-HIKE
